AI Web Search In The GeekyBot!
AI Web Search
To access the AI Web Search detail page, navigate to the Admin Dashboard –> Dashboard Menu –> Web Search –> click on Web Search from your admin dashboard. On the AI Web Search page, you will find various options for the admin to manage the AI Web Search.
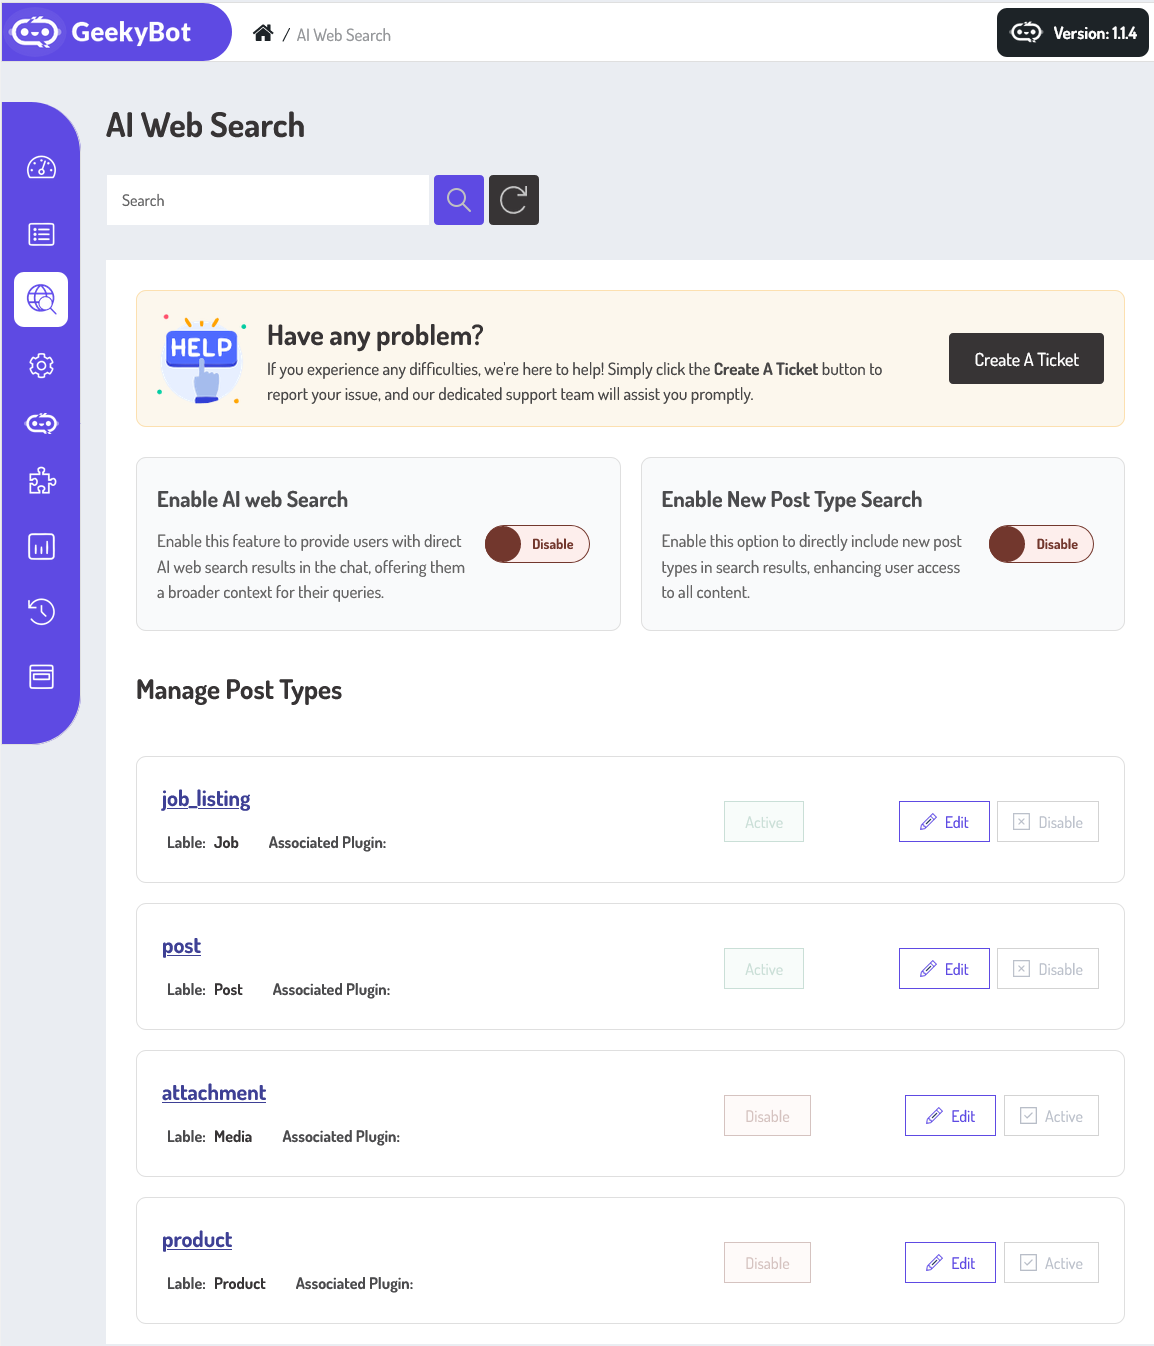
Enable AI Web Search
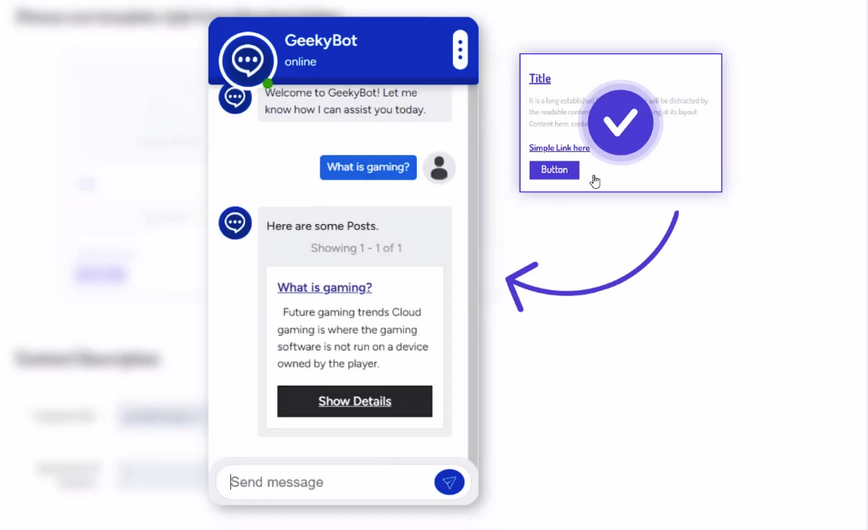
The AI Web Search feature is designed to help you find accurate, real-time information from across the web using natural language input. Instead of typing complex search queries or manually sifting through multiple links, you can ask a question or describe what you’re looking for in plain language. The AI then performs a smart web search, scans the most relevant results, and returns a summarized answer.
In addition, the AI understands context. If you’re already browsing a topic and want more specific information, like asking, “What’s the battery life of the HP Envy x360?”—it will refine the search based on your previous query, ensuring your results stay relevant. This creates a more personalized and fluid experience, much like interacting with a smart assistant.
Overall, the AI Web Search function brings the power of real-time information and intelligent summarization into one seamless experience. Whether you’re researching, shopping, learning, or just curious, this feature simplifies the process and delivers trustworthy answers in seconds.
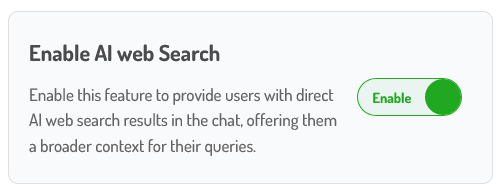
Frontend Preview (AI Web Search)
The AI Web Search feature is designed to help you find accurate, real-time information from across the web.
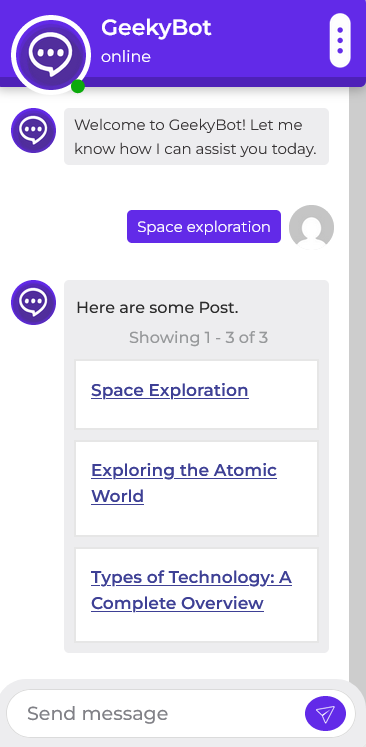
Enable New Post Type Search
The New Post Type Search feature is designed to make it easier and faster for users to find specific kinds of content within your platform. Instead of browsing through all posts or using generic search terms, users can now search based on post types, such as articles, announcements, or events. This smart filtering system helps users locate the exact content they’re interested in without scrolling endlessly.
Let’s say a user is looking for a tutorial, a product update, or an event invite. This feature helps them find the right content in just a few clicks.
Overall, the New Post Type Search adds structure and precision to how users interact with content. Whether someone is searching for information or interactive content, this feature ensures they can filter their way to the right kind of post with just a few taps.
Manager Post Types
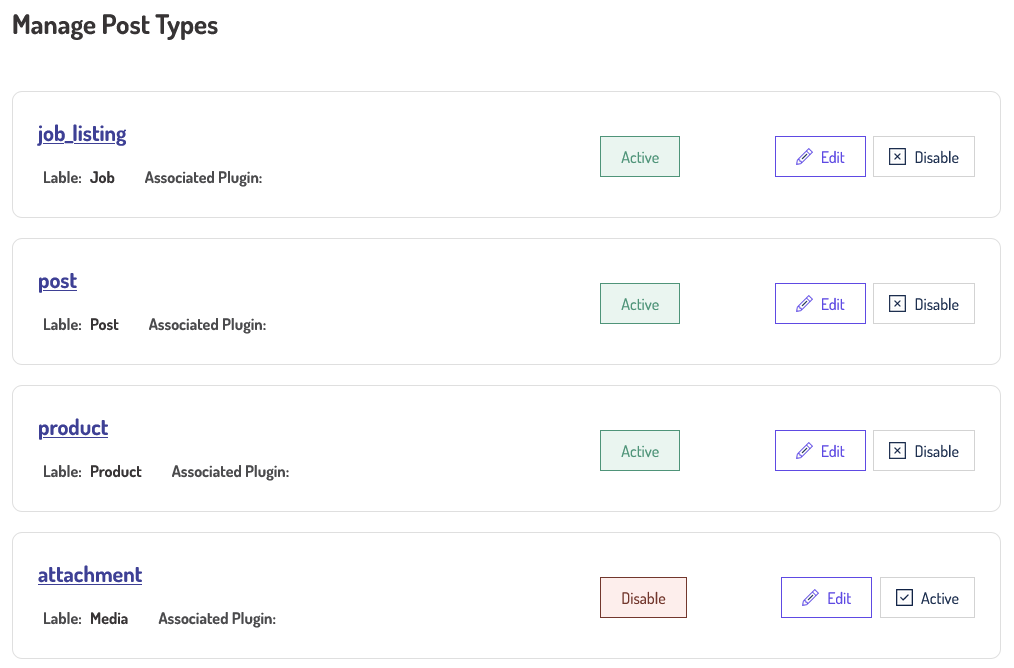
Users can manage different post types. There is a post title, label, and associated plugin. Buttons for Edit, Disable, and Activate are styled differently for clarity (e.g., red for Disable, green for Active).
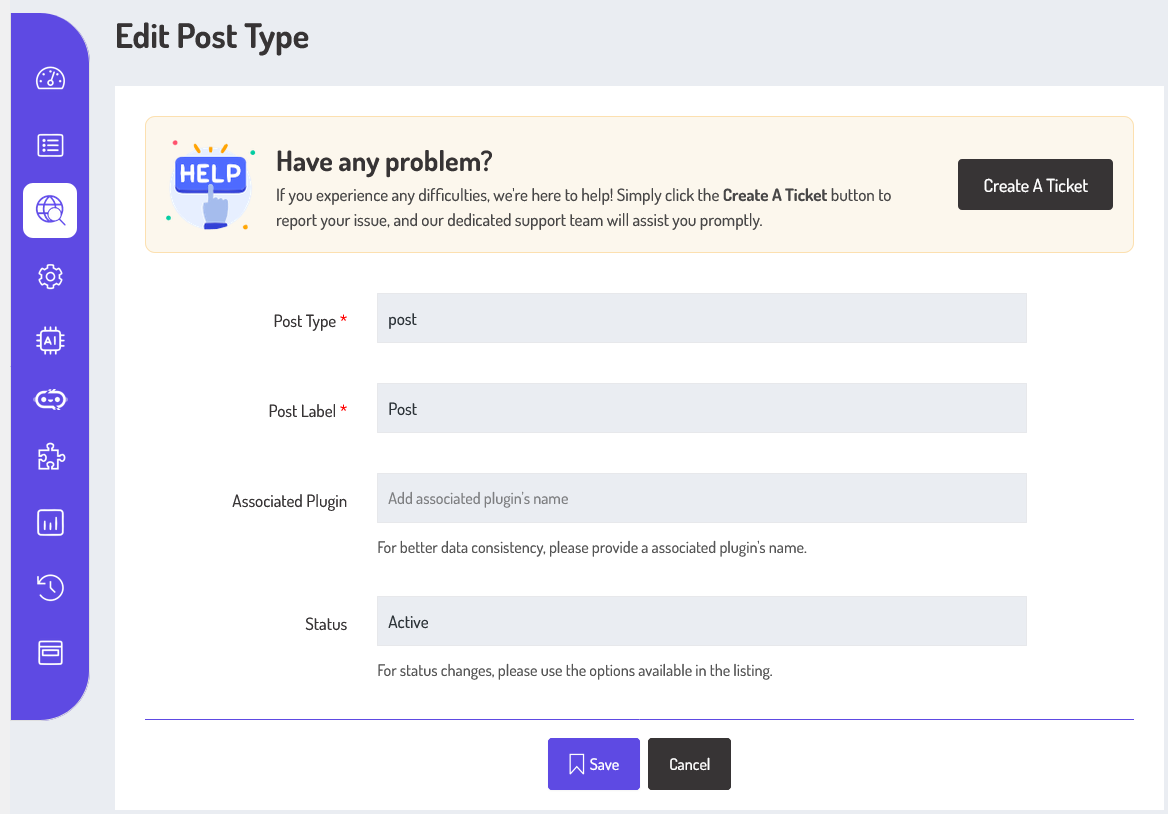
This screen is mainly used to update the post label and associated plugin for a post type, while core fields like post type and status are read-only from here. Status changes must be made from the main listing screen (as seen in your first image).
- Save: To save any changes (like to the post label and associated plugin).
- Cancel: To discard changes.
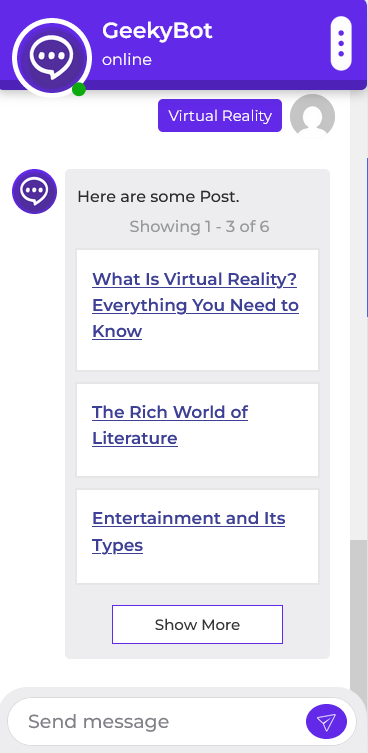
Frontend Preview (Post Type Search)
Install Custom Listing Style & Custom Text Style Addons
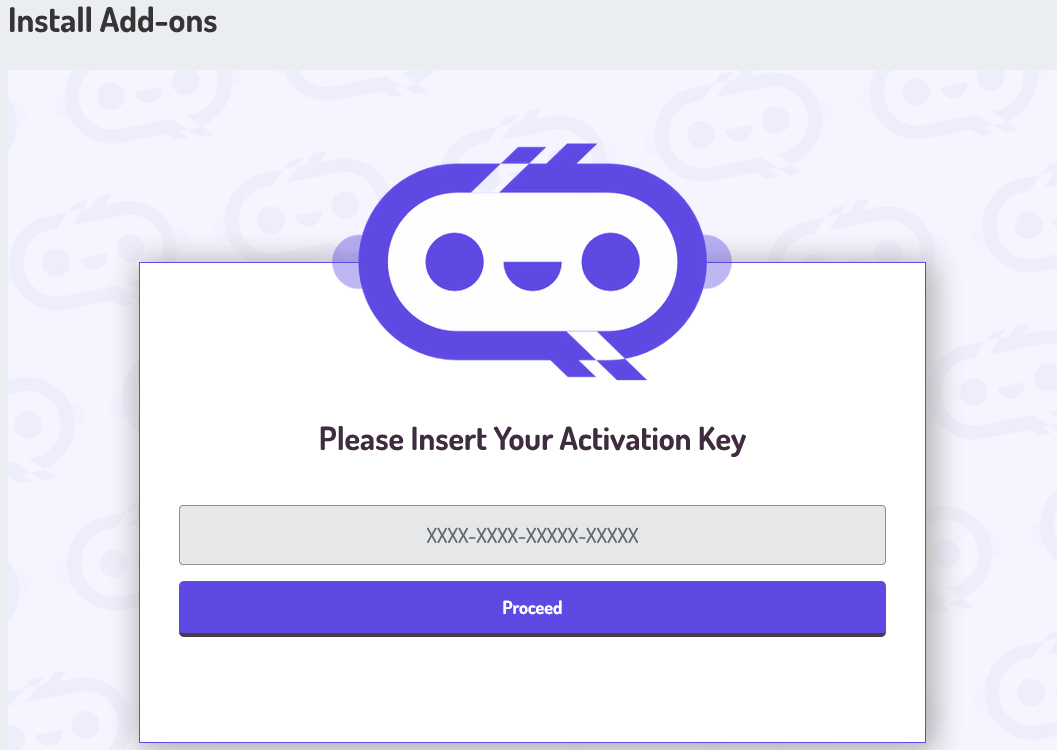
To install and activate the addon, access the addon page, navigate to the Admin Dashboard –> Dashboard Menu –> Install Add-ons. On the install add-ons page, please insert your activation key and click on the proceed button.
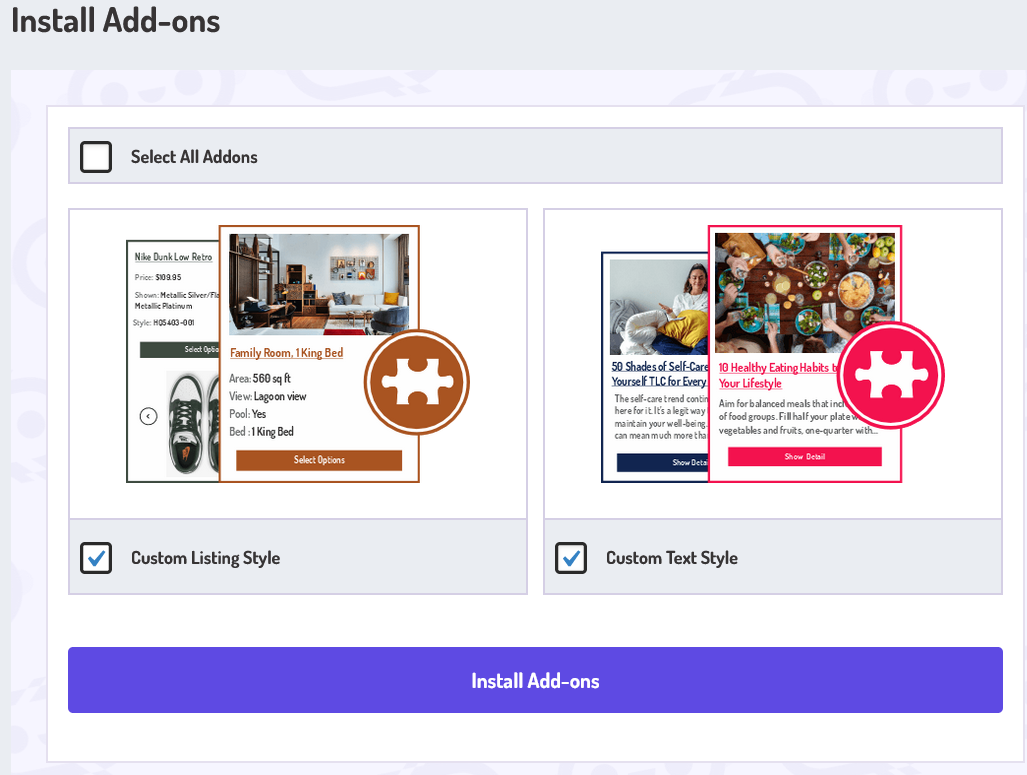
Select the “Custom Listing Style” and“Custom Text Style” add-ons from the add-ons listing page and click the install add-on button. First, we talk about:
Custom Text Style
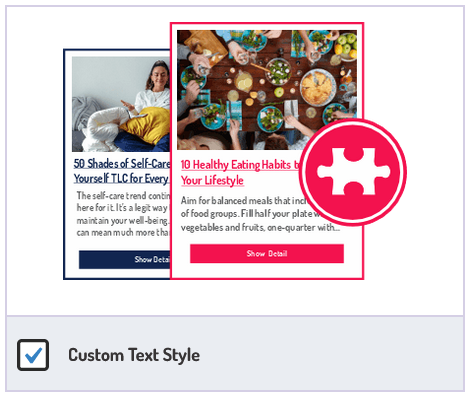
In GeekyBot’s AI Web Search, the Custom Text Style feature allows you to personalize how the results are displayed. Instead of receiving plain text outputs, you can select from pre-designed templates that define the visual structure of the result, such as showing a thumbnail, title, brief description, and an actionable button.
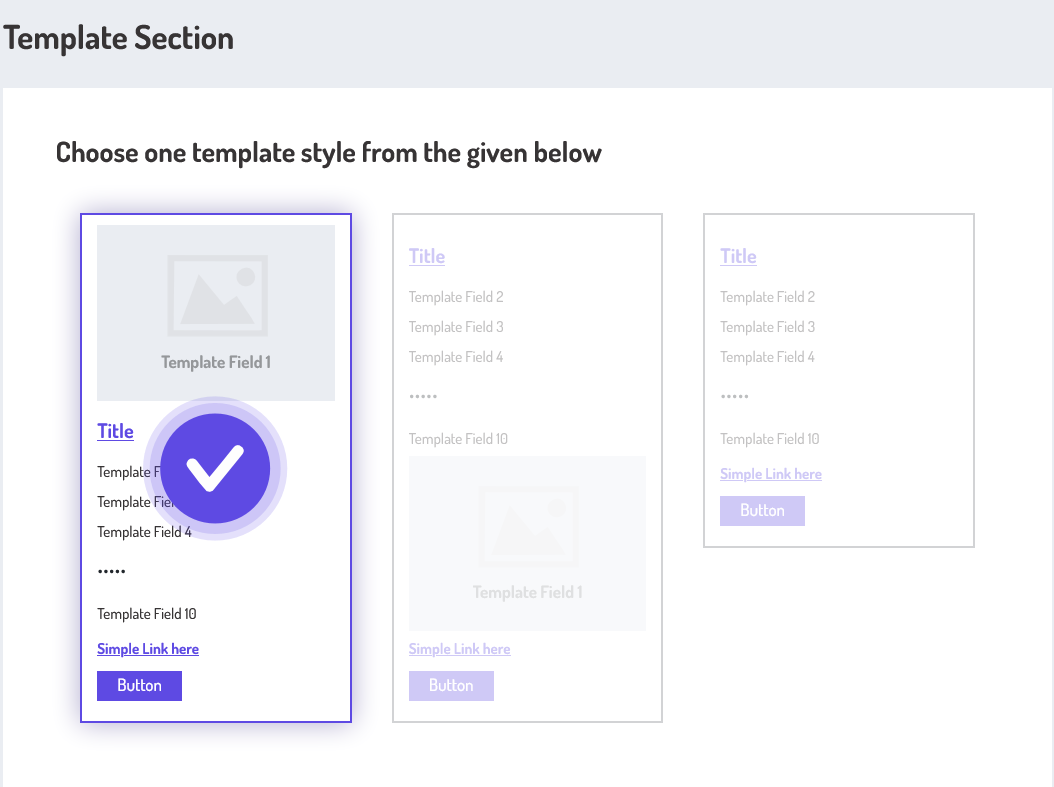
Choosing a Template Style
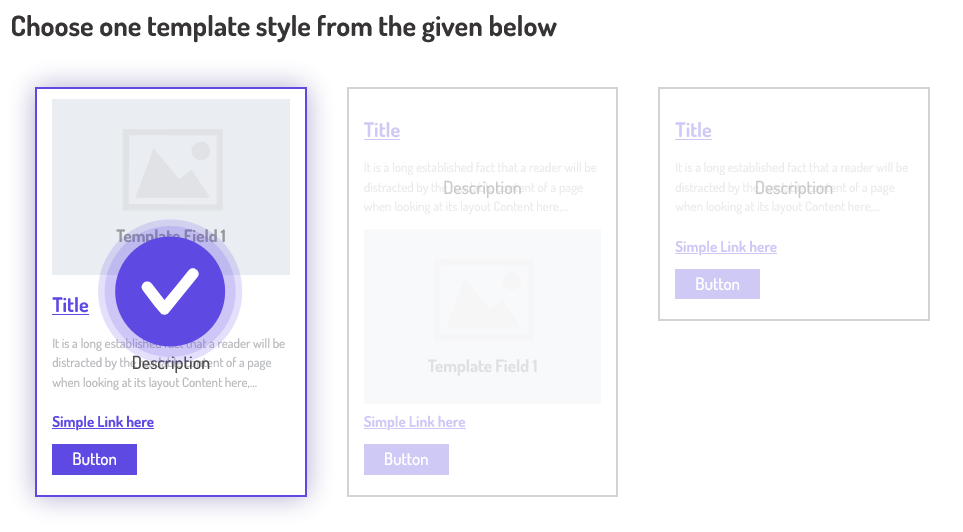
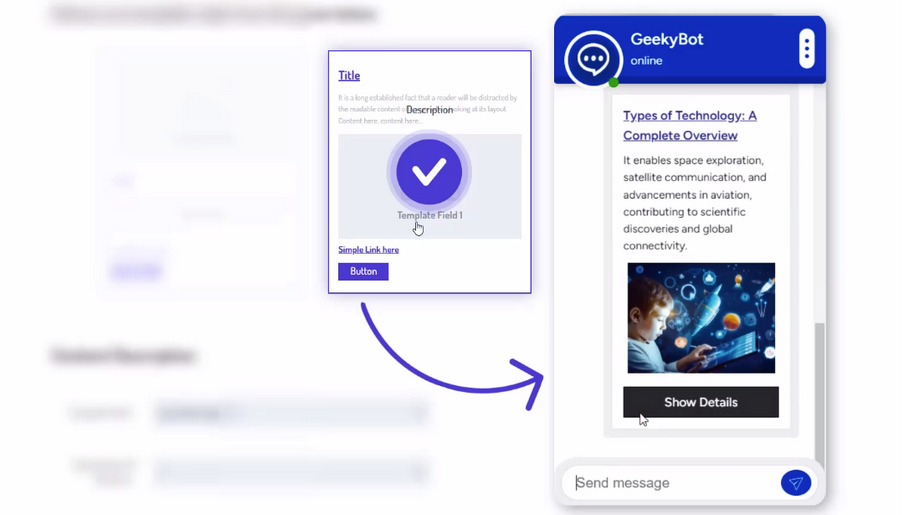
At the top of the Template Section, you can choose one of several layout options. Each card represents a different text+UI style. For example, one template might highlight the title, description, and a link, while another could focus more on visual content like thumbnails. When you click on a template, it becomes highlighted with a checkmark, indicating your selection.
1st Template Style
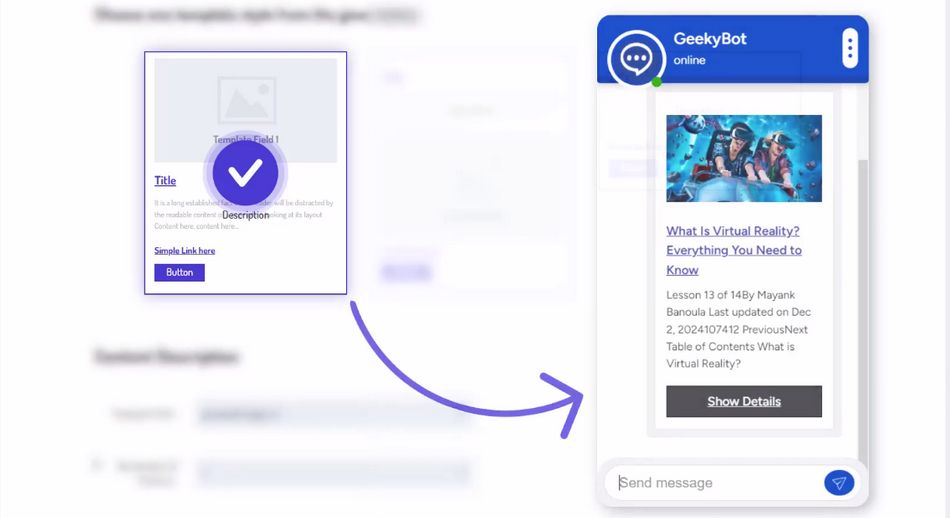
If someone searches and you’ve selected a template with an image, title, description, and a button, the search result might appear like:
2nd Template Style
If someone searches and you’ve selected a template with a title, description, image, and a button, the search result might appear like:
3rd Template Style
If someone searches and you’ve selected a template with a title, description, and a button, the search result might appear like:
Content Description
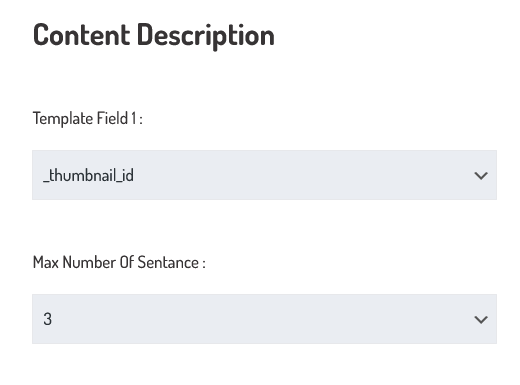
Below the templates, the Content Description area allows you to use dynamic content fields like images (thumbnail_id) and control how much text is shown. You can set the “Max Number of Sentences” field to limit how long the summary should be, ideal for displaying only key takeaways or a short snippet instead of a long paragraph.
The Content Description area allows you to set dynamic content fields according to your requirements.
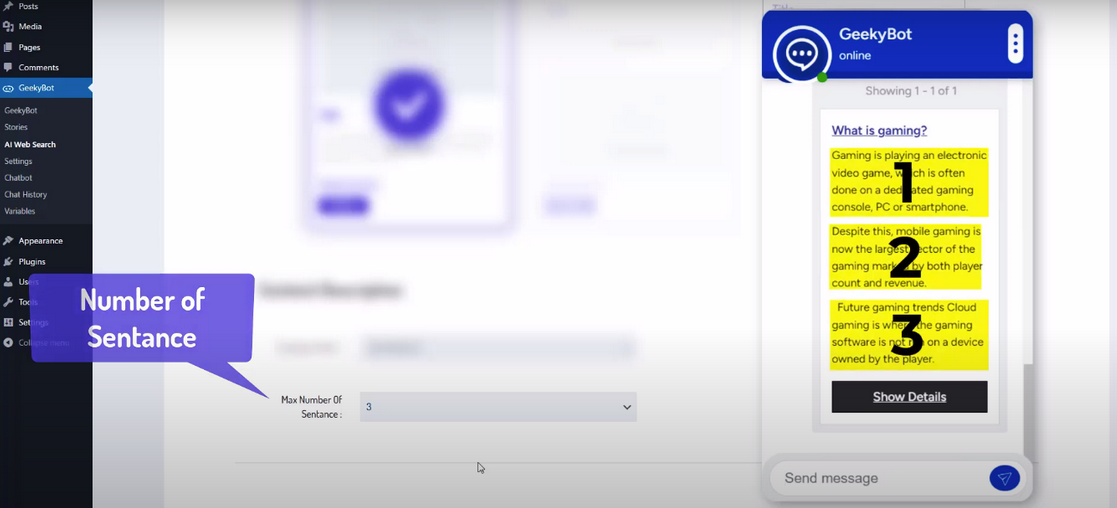
You can set the “Max Number Of Sentences” field to limit how long the summary should be, displayed.
Add Button /Link
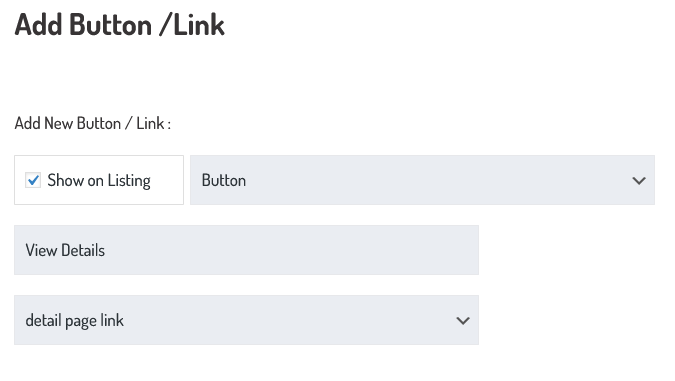
To make your results actionable, you can add a button or link to this interface. Just check the “Show on Listing” check box, then define the label (e.g., “View Details”) and link type (e.g., “detail page link”). This allows users to click through to the full article, product, or external resource directly from the search result.
Custom Listing Style
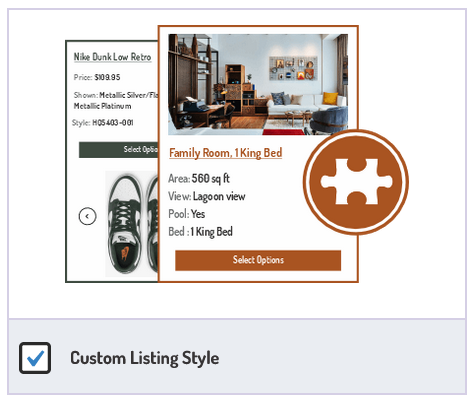
In our AI Web Search platform, you now have the power to offer a Custom Listing Style using our flexible Template Section. This feature allows you to personalize how your search results appear to users by choosing from a variety of card-based templates. These templates are designed to help you visually organize your data, such as job listings, company details, or products, in an elegant, informative, and structured format that enhances user experience.
Choosing a Template Style
To start, simply choose a layout from the available styles at the top of the section. Each template offers a different visual hierarchy and structure, allowing you to tailor how images, text fields, and buttons are arranged. For instance, one template might prioritize visual branding by placing the company logo at the top, followed by key job information, while another might emphasize textual content like location, job type, and application method. Once a style is selected (highlighted with a checkmark), you can begin configuring it with your data.
1st Template Style
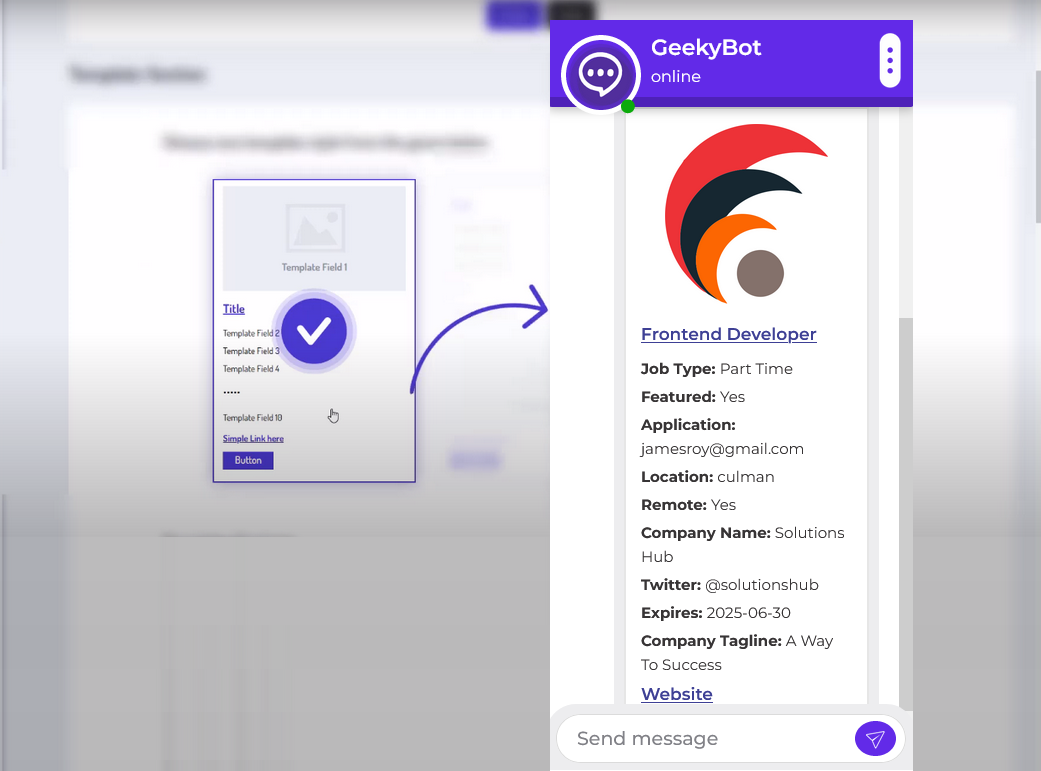
The selected layout in the screenshot highlights an image at the top (Template Field 1), followed by a title, key job information fields, and an action button/link at the bottom. This provides a familiar, card-style look that enhances readability and user engagement. A single result card might show:
- Logo: A company’s brand image.
- Title: Job position.
- Fields: Job Type, Featured, Location, Remote option, Company Name, Expiration Date, and so on.
- Button/Link: “Website” linking to the company’s site.
2nd Template Style
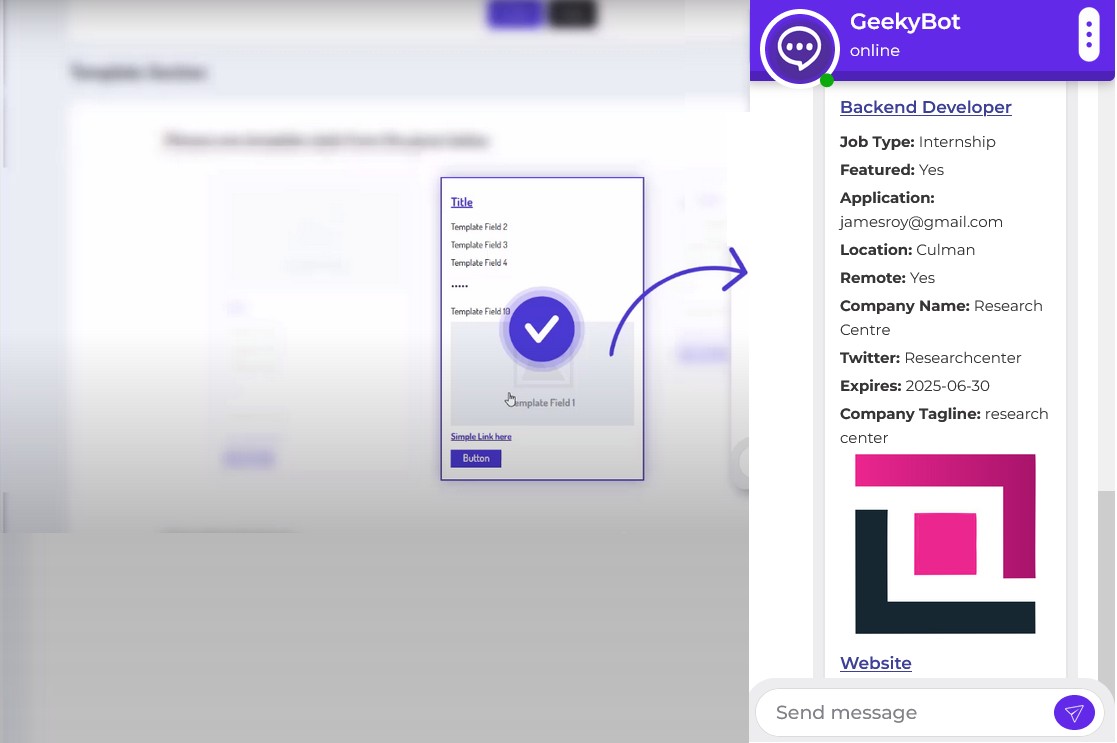
The selected layout in the screenshot highlights a title at the top, followed by job information fields, an image/logo, and an action button/link at the bottom. This provides a familiar, card-style look that enhances readability and user engagement. A single result card might show:
- Title: Job position.
- Fields: Job Type, Featured, Location, Remote option, Company Name, Expiration Date, and so on.
- Logo: A company’s brand image.
- Button/Link: “Website” linking to the company’s site.
3rd Template Style
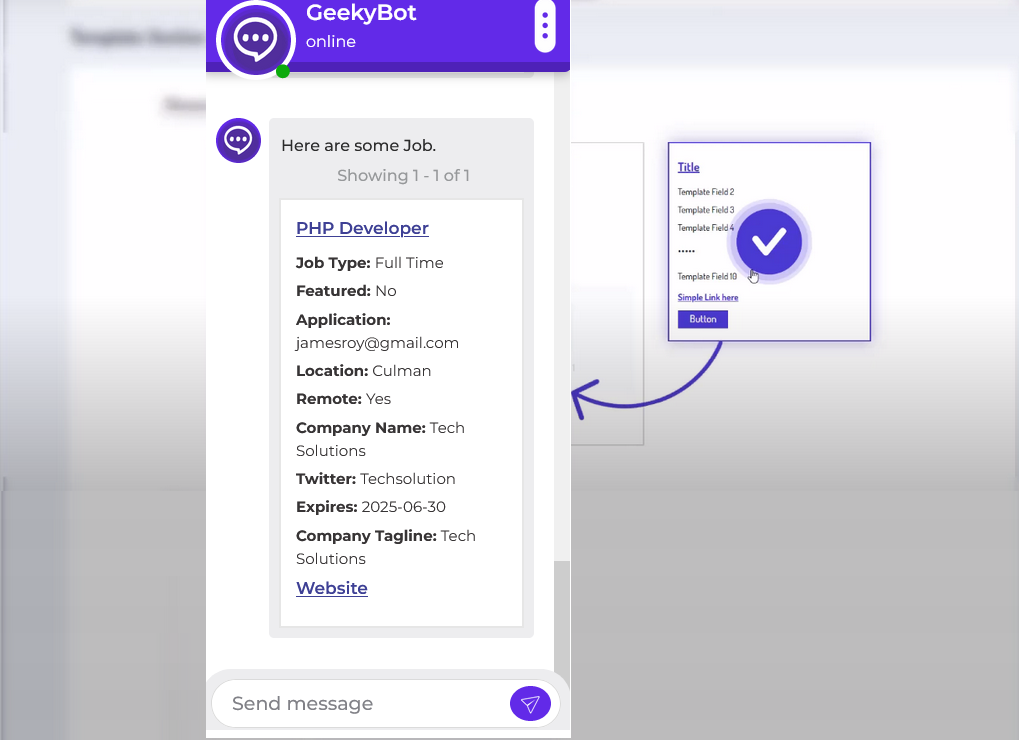
The selected layout in the screenshot highlights a title at the top, followed by job information fields and an action button/link at the bottom. This provides a familiar, card-style look that enhances readability and user engagement. The search result might appear like:
- Title: Job position.
- Fields: Job Type, Featured, Location, Remote option, Company Name, Expiration Date, and so on.
- Button/Link: “Website” linking to the company’s site.
Template Content
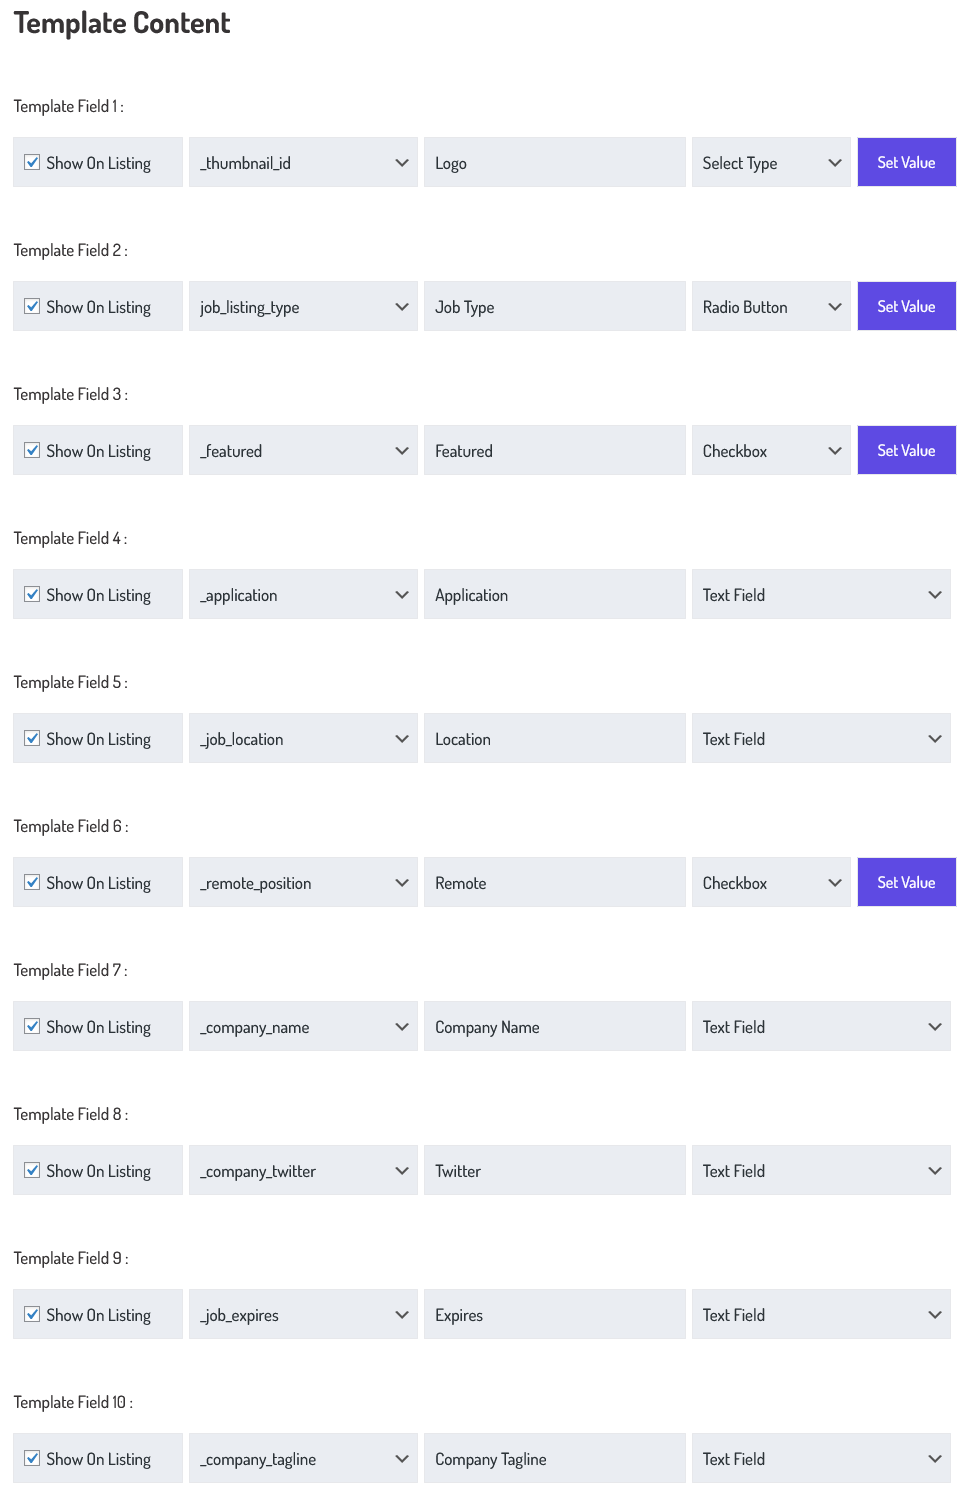
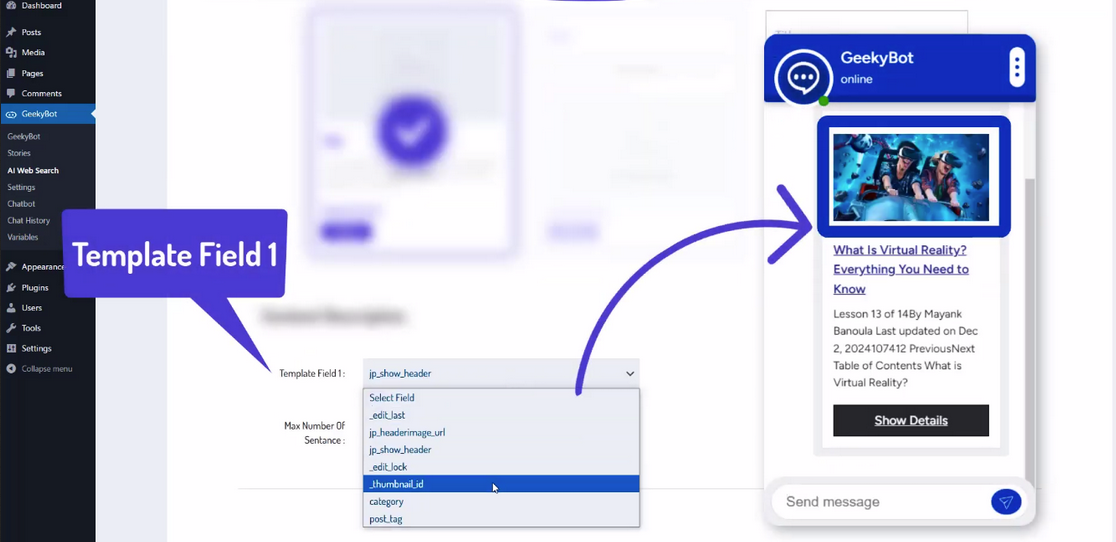
Next, in the Template Content section, you can assign up to 10 different fields to the template. For each template field, you can decide whether it should be shown, link it to a dynamic content variable (e.g., _thumbnail_id, job_listing_type, or _company_name), and give it a clear label (like “Job Type” or “Company Name”). You can also choose how the field should be rendered, whether as plain text, a checkbox, or a radio button.
- “Show on Listing” controls the visibility of the field.
- Select a dynamic content source (e.g., _thumbnail_id, job_location, or company_name) from your dataset.
- Label the field for end-user clarity (e.g., “Location” or “Expires”).
- Choose the input type (e.g., text field, checkbox, radio button, dropdown) to define how the data is interpreted and styled visually.
For example, you could configure Template Field 1 to show the company logo using _thumbnail_id, Field 2 to show the job type using job_listing_type, etc. This structured approach ensures consistent formatting across all search results.
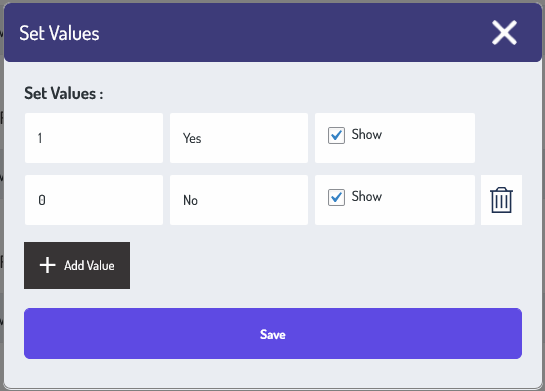
The Set Values pop-up in GeekyBot allows you to define exactly how specific backend values should appear in your custom listing layout. This is especially useful for fields like checkboxes and radio buttons. If the underlying data contains a 1, you’ve labeled it as Yes and opted to show it in the listing. Similarly, a value of 0 is mapped to No and also marked as Show. This feature shines when paired with fields like Featured or Active Status. For example, a field like _featured might be stored as a simple binary value 1 for featured and 0 for not featured.
- Value: This is the raw value stored in the database or field (e.g., 1 or 0).
- Label: This is what the end-user will see (e.g., Yes for 1, No for 0).
- Show Checkbox: When checked, the value will be shown on the listing. You can uncheck it if you want; the value will not be shown on the listing.
- The Add Value button allows you to extend the fields.
Once you hit the save button, GeekyBot will use your mappings every time it renders results using this template.
Add Button /Link
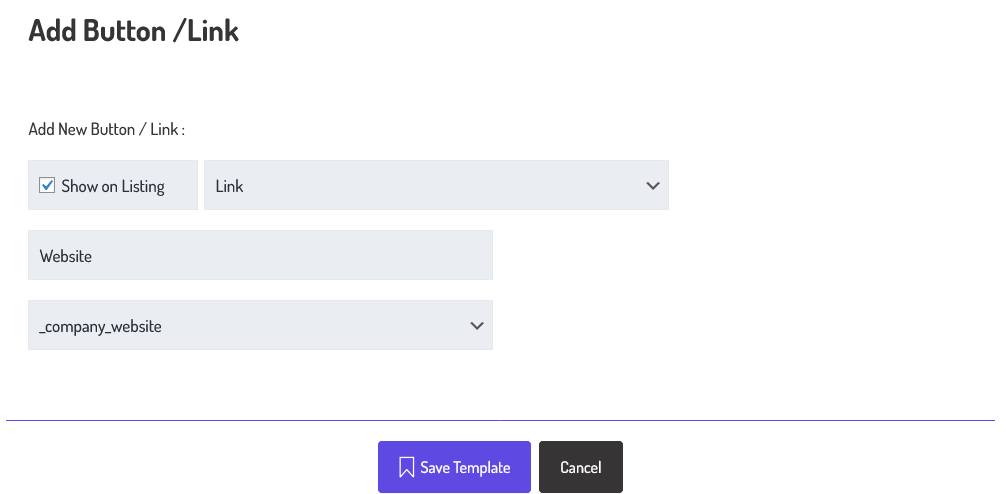
Additionally, under Add Button / Link, you can include interactive buttons like a link to the company’s website. You choose the button type (Link or Button), label it (e.g., “Website”), and connect it to the relevant field, such as _company_website. This makes the listings not just informative but actionable, allowing users to interact with the results meaningfully.
Once you’re satisfied with your configuration, hit Save Template to apply your custom style. This setup ensures that your search results are not only intelligent and accurate but also beautifully displayed and highly functional, offering users a truly modern browsing experience.