WooCommerce Story In The GeekyBot!
Built WooCommerce Story

Now, let’s build a story from the admin end. From your admin dashboard, navigate to the Admin Dashboard–> Dashboard Menu–> Stories–> Built Story.
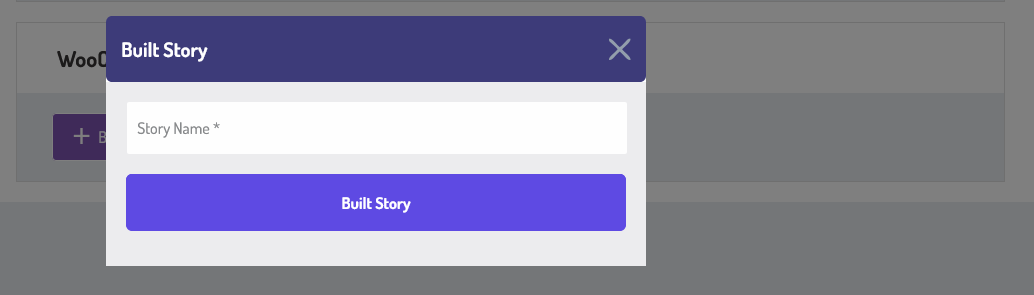
To start creating a WooCommerce story, click on the built story button. A pop-up will appear on the screen. On the ‘Built Story’ popup, we will provide all the details for building a story.
- Name is a required field to enter the story name.
Click on the Built Story button. Your story will be successfully built.
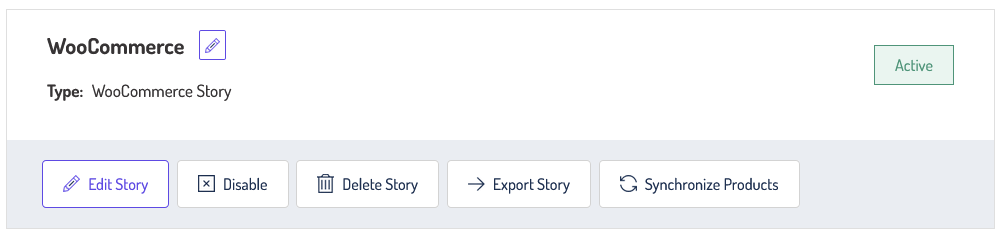
It represents an individual story, it has a story, name, type (AI ChatBot), and a story status (e.g., “Status: Active”). There are options to edit, enable/disable, delete, export the story, and synchronize products.
- Manage Story:
- You will find several options for managing your story:
- Edit Story: Modify the story details.
- Enable/Disable: Enable/Disable controls the activation of your story.
- Delete Story: Remove the story from your list.
- Export Story: Save your export in XML format.
- Synchronize Products: Synchronized products offer a smart way to manage related items efficiently. Whether you’re handling product updates, syncing, or managing stock levels, this feature ensures everything stays consistent and up to date.
- You will find several options for managing your story:
To access the Woocommerce Story detail page, navigate to the Admin Dashboard –> Dashboard Menu –> Stories –> click on the story title from your admin dashboard. On the WooCommerce Story page, you will find various options for the admin to manage the WooCommerce Story.
Search With NLP & Simple

An NLP (Natural Language Processing) search engine understands queries in everyday language. Natural language processing (NLP) focuses on the relationship between human language and machines based on the use of natural language. Natural language search isn’t based on keywords like traditional search engines, and it picks up on intent better since users can use connective language to form full sentences and queries.
Simple Search is a keyword-based search system. A simple search matches exact keywords in your storyboard content. When you type in a query, the system looks for exact or partial matches of those words in the text. It doesn’t understand the meaning or context, just the presence of words. For example, searching for “marketing strategy” will return all results containing those exact words.
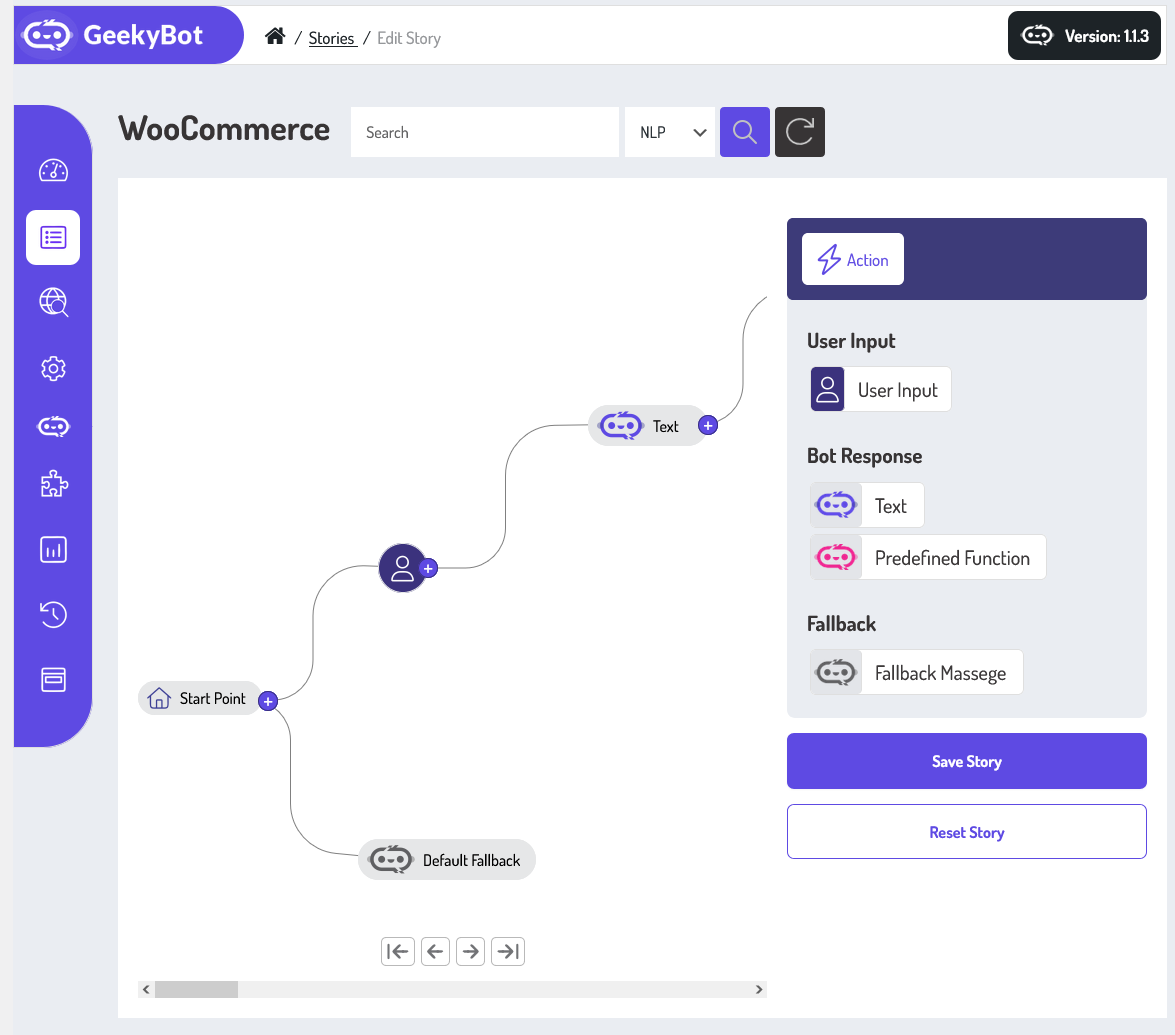
Storyboard and Action
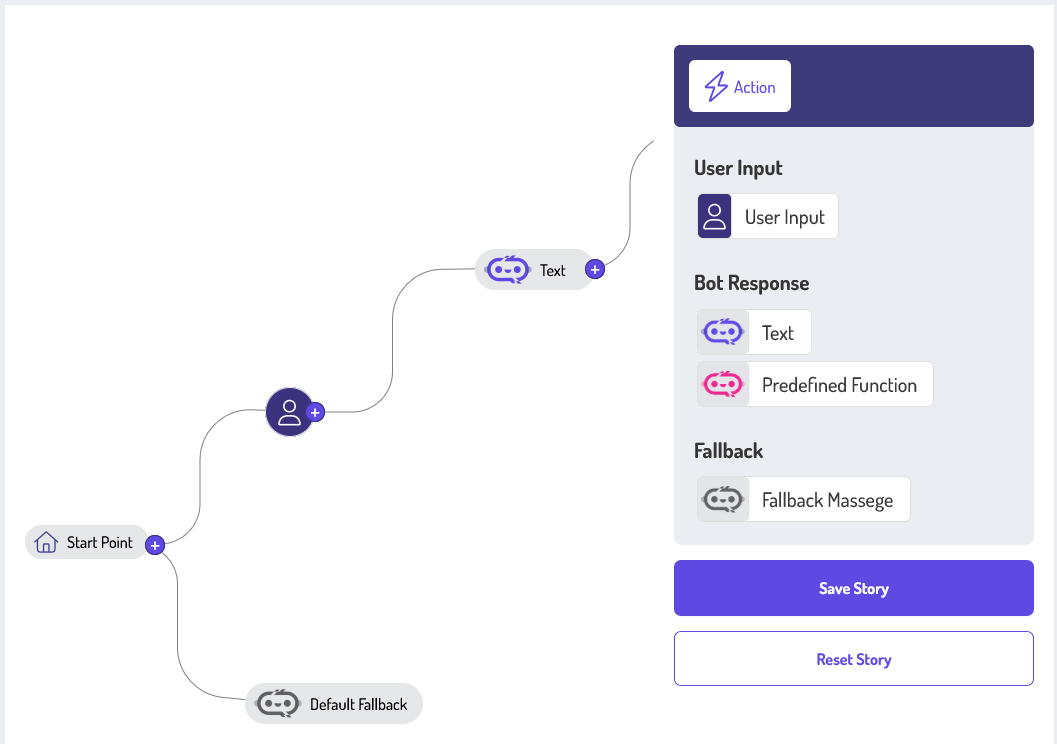
The storyboard can break down your vision into clear visual steps. It’s like having a digital whiteboard that understands your words and turns them into visual panels. You can edit each frame and add dialogue. This portion represents a storyboard and its actions. On the right side of the storyboard, the actions are User Input, Bot Response (Text, Predefined Function), and Fallback Message.. Admins can create a story by dragging and dropping these actions on the storyboard according to their requirements. There is a starting point at the storyboard where you can start to create the story.
User Input
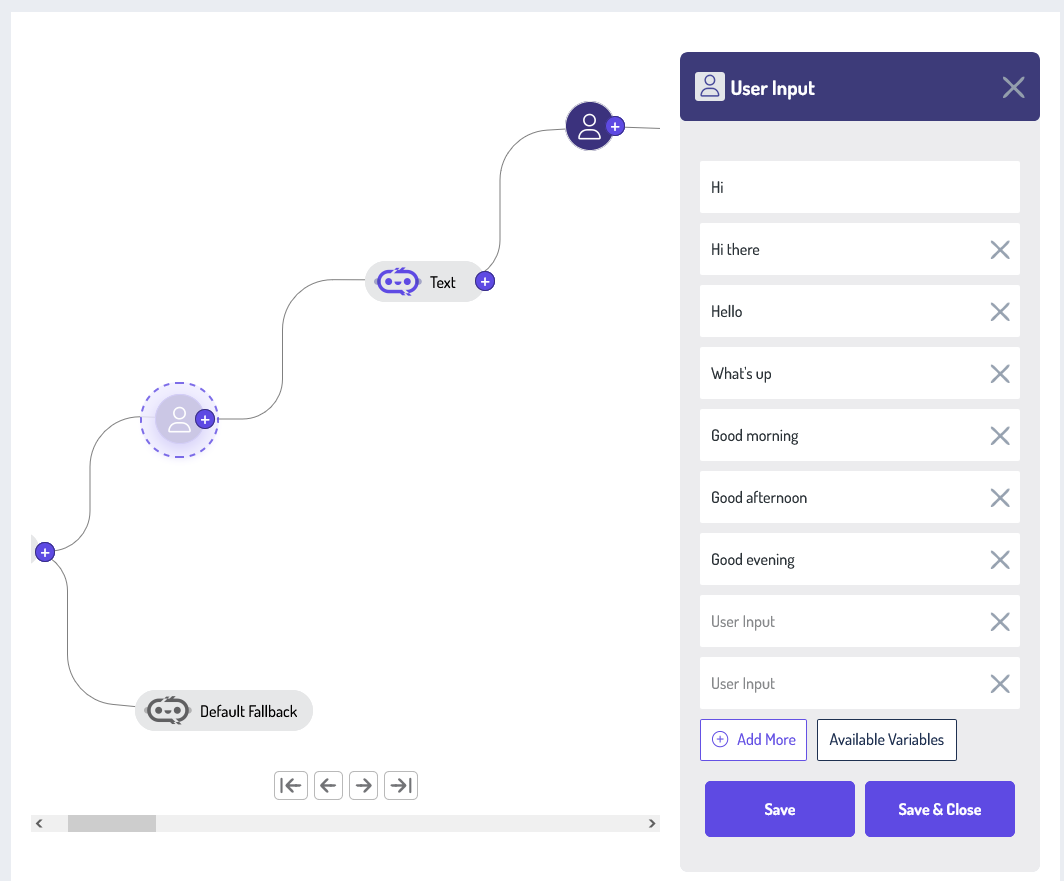
Admin can create the story by dragging and dropping the user input on the Storyboard. After selecting the user input from the storyboard, your inputs should provide clear instructions on what actions the bot should take and what actions it should avoid. This includes guiding what types of questions or requests the bot can handle and what it cannot. When writing your story, consider the user’s perspective. What problem are they trying to solve? What language do they use? What kind of personality do they have? By considering these factors, you can create a story that resonates with your users.
There are two buttons on the right side: Add More and Available Variables. You can add more input values by clicking on the Add more button.
Frontend Preview
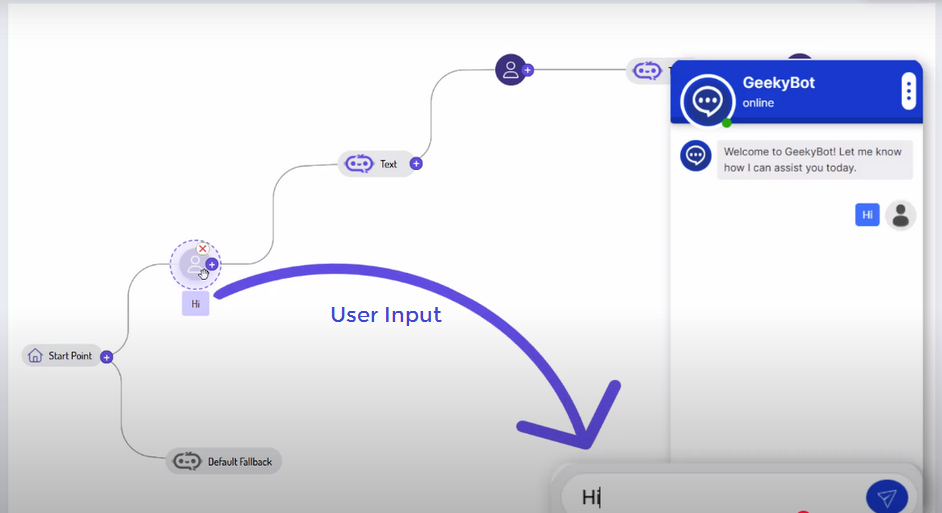
The interaction between a user and a chatbot. The user sends a message to say “Hi”. The message that is sent by the user is called “User Input.”
Bot Response
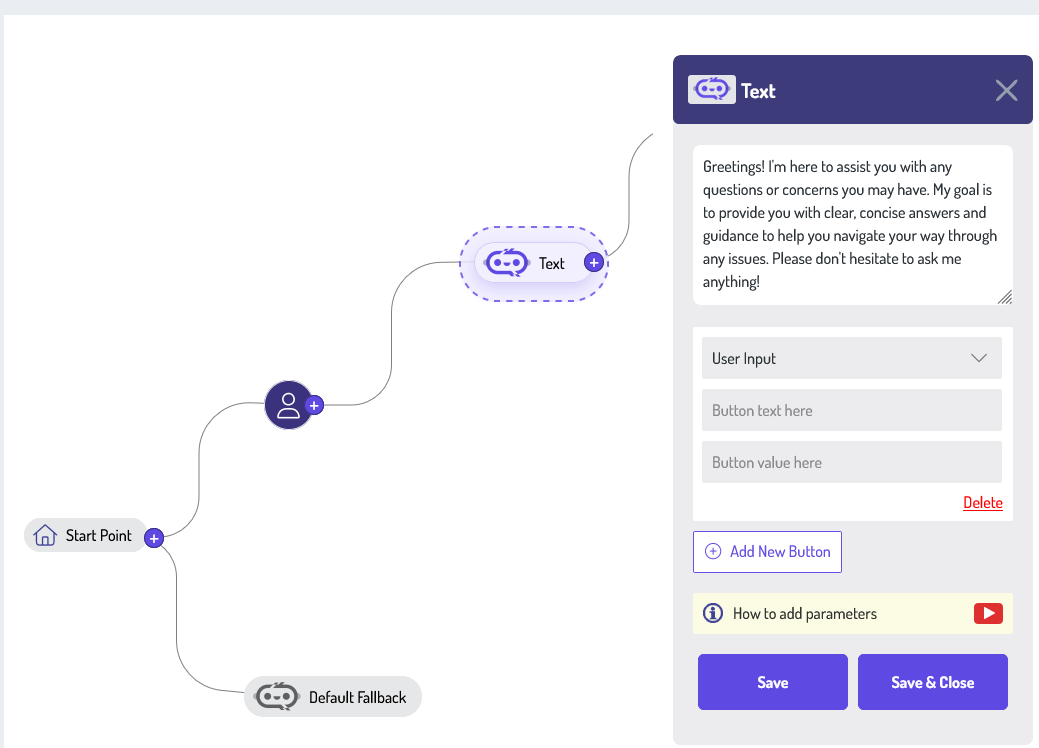
The admin can create the bot response by dragging and dropping the bot text on the Storyboard. After selecting the bot response from the storyboard, your bot response should be concise and to the point. Avoid lengthy or irrelevant information that may confuse or frustrate the user. Stick to the key points that are essential for the user’s understanding. The tone of your bot response should match the personality of your conversational chatbot. If your bot is meant to be friendly and helpful, the tone should be warm and welcoming.
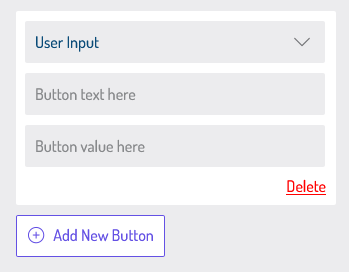
There are options to add buttons/links in bot responses. Click on the Add New button. The form will appear on the screen. We will provide all the necessary details for adding buttons/links in the bot response.
- There is a drop-down field where you can select the button or link option.
- Enter the button/link title.
- Set the button/link value.
- Click on the delete link to remove the button.
- You can add multiple buttons by clicking on the Add New Button.
Once you are done with the bot response, hit the save button. The bot response has been successfully saved.
Frontend Preview
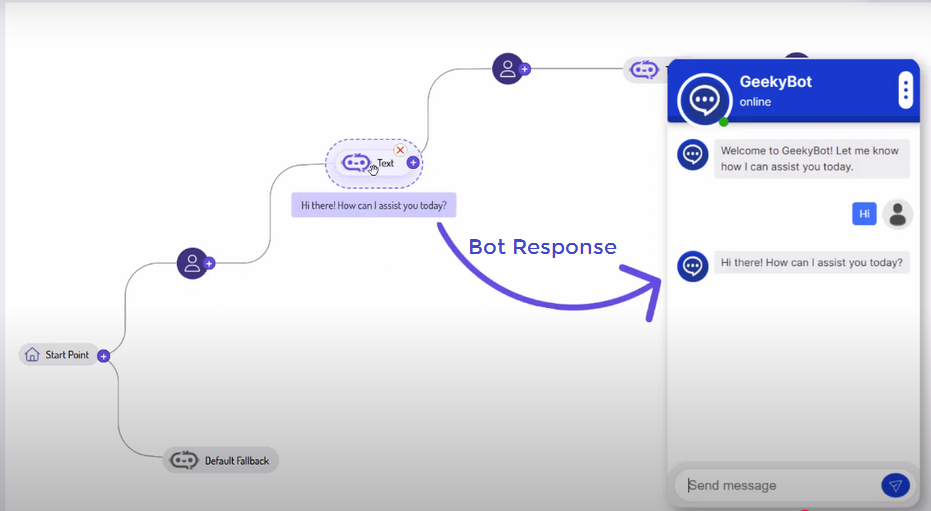
ChatBot responds to the user input with the message: “Hi! There, how can I assist you today?”.
Available Variable
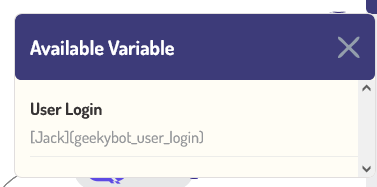
In your storyboard, variables are a powerful way to personalize and control the flow of your story. A variable is like a container that holds a piece of information. This could be a number, a name, a choice made by the user, or even a status (like “visited” or “completed”). By using variables, your story can respond dynamically to the user’s actions and decisions, creating a more interactive and customized experience.
When you click on the available variables button, a pop-up will appear on the screen that shows all the available variables in the system. You can use these variables according to your requirements. Once you are done with the inputs, hit the save button. The user inputs have been successfully saved.
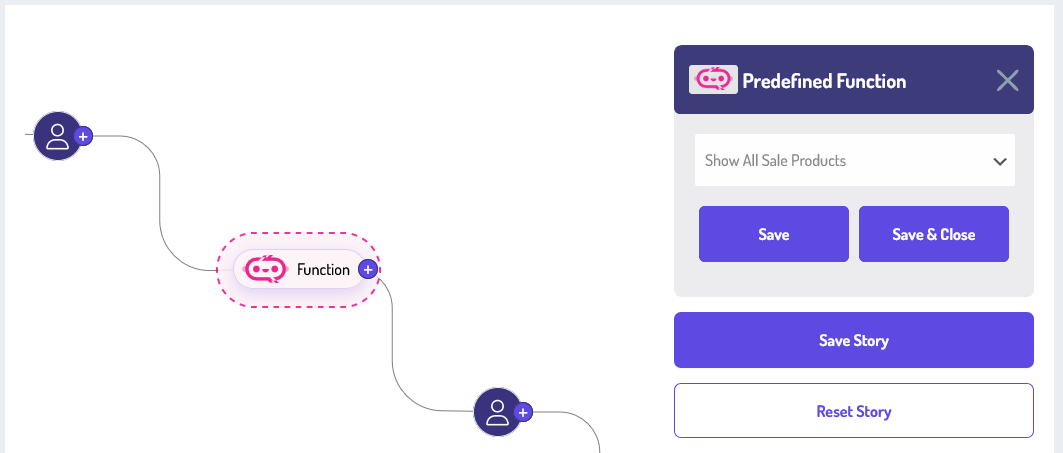
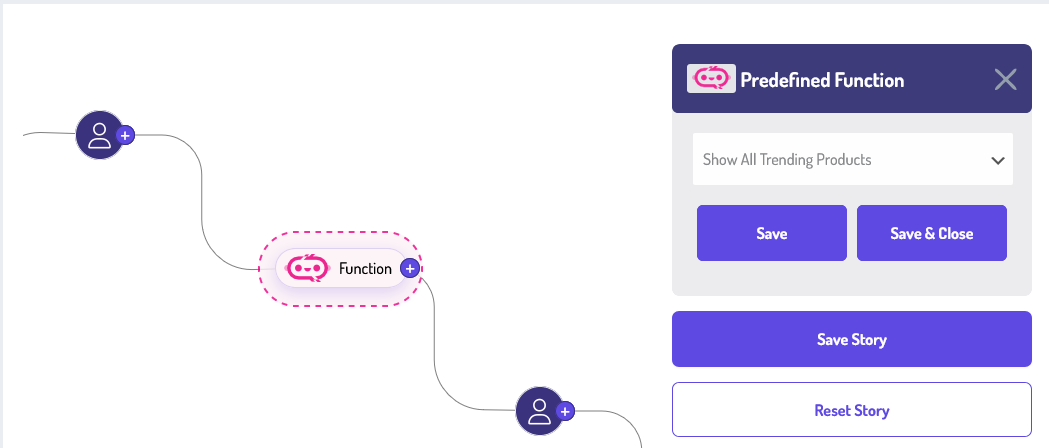
Predefine Funcations
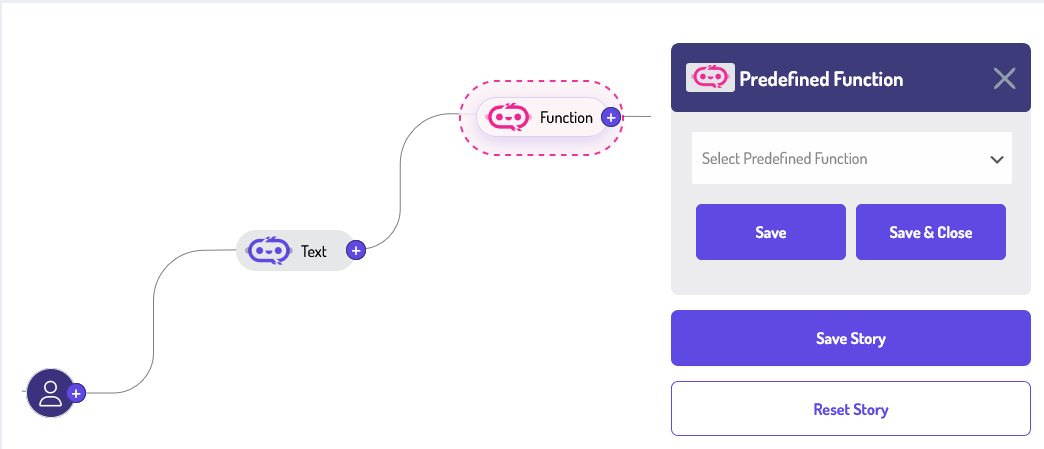
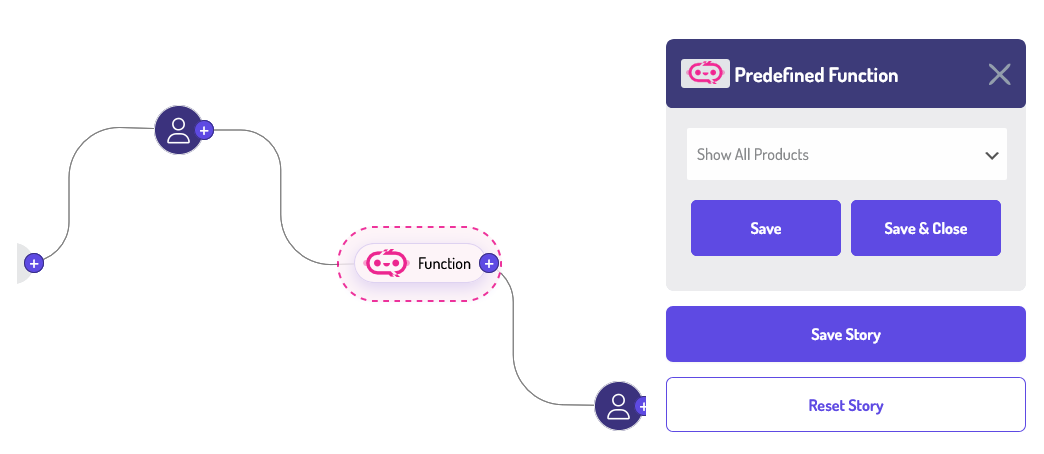
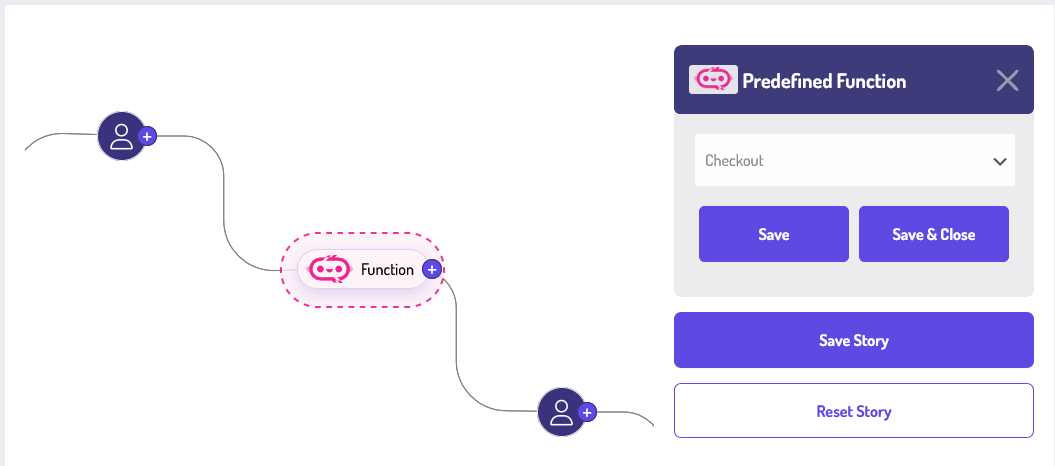
In your storyboard, predefined functions are like shortcuts that you can use to create dynamic, responsive, and engaging stories with minimal effort. They’re designed to make your storyboard experience smoother and more intuitive. For example, suppose you’re building an interactive story where a character needs to greet the user. Instead of manually writing out the logic for handling different greetings depending on the time of day, you can simply use a predefined function like getGreeting(). This function might return “Good morning,” “Good afternoon,” or “Good evening” based on the system time.
Admin can use functions by dragging and dropping the predefined function onto the Storyboard. After selecting the function from the storyboard, you can set the function according to your requirements. All available functions are listed in the drop-down menu.
List of Predefined Functions
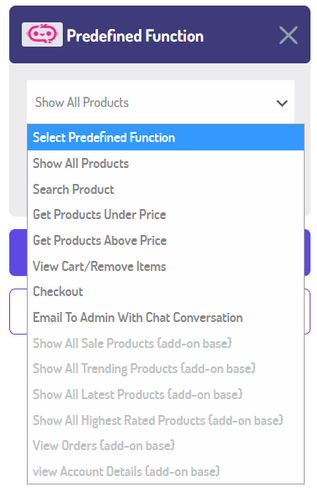
All available functions are listed in the drop-down menu. These predefined functions are designed to streamline the shopping experience, automate frequent tasks, and help users get exactly what they need with minimal effort. Active (Selectable) Options are:
-
Show All Products
-
Search Product
-
Get Products Under Price
-
Get Products Above Price
-
View Cart/Remove Items
-
Checkout
-
Email to Admin With Chat Conversation
Additionally, there are some functions marked as “add-on base”. Inactive (Greyed-out) Options are:
-
Show All Sale Products
-
Show All Trending Products
-
Show All Latest Products
-
Show All Highest Rated Products
-
View Orders
-
View Account Details
Let’s describe one by one the functionality of the predefined functions that are listed in the dropdown menu. First, we talk about the
Show All Products
The “Show All Products” function is designed to provide users with a comprehensive view of every item available in your store or catalog. When a user selects this function, the system retrieves and displays all the products without applying any filters or search keywords. This is especially useful for users who are browsing without a specific item in mind and want to explore everything your store has to offer. Each product is usually displayed with key details like the name, price, image, and possibly a short description or rating.
For example, if a user visits your site for the first time and doesn’t know what they’re looking for, this function serves as a quick way to explore and get inspired. It’s also ideal for users who enjoy window shopping or comparing a variety of options before making a decision.
By including the “Show All Products” feature in your storyboard, you’re making your application more intuitive and customer-friendly. It gives users a sense of control and flexibility while also increasing the visibility of your full inventory, ultimately helping boost engagement and sales.
Frontend Preview (Show All Products)
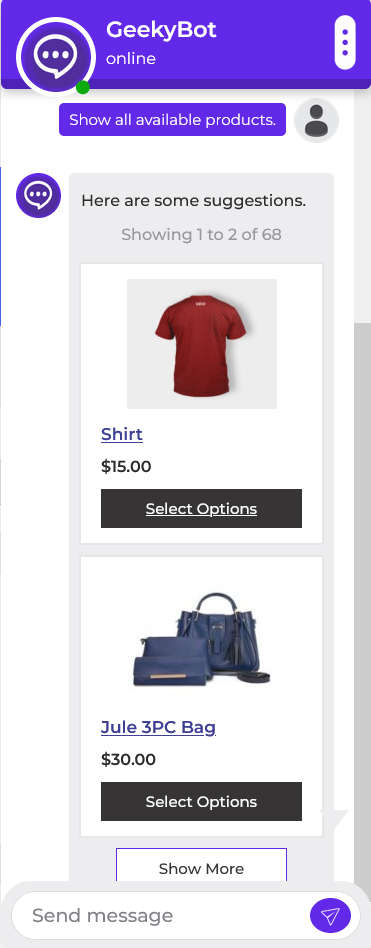
If a user wants to browse all the items available in the store, they can simply use this function; the system retrieves and displays all the products without applying any filters or search keywords.
Search Product
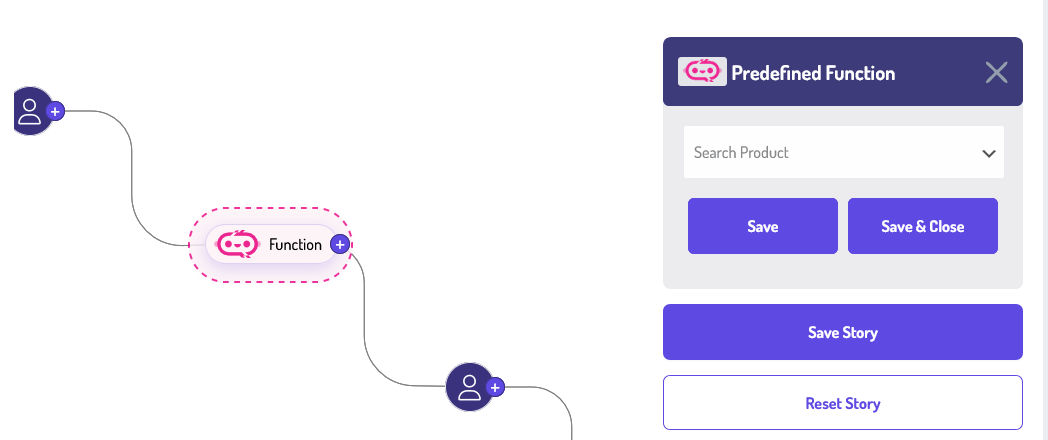
We know how important it is for you to quickly find exactly what you’re looking for. That’s why we’ve built a powerful and intuitive product search function to help you navigate through our wide range of items with ease. Whether you have a specific product in mind or you’re just browsing. This function is designed to save you time and provide relevant results in seconds.
Let’s say you’re searching for a “wireless Bluetooth speaker.” Once you enter those words into the search bar, the system will display a list of Bluetooth speakers that are wireless, along with product images, prices, and quick descriptions.
A search product function doesn’t just save time, it improves your overall shopping experience. Whether you’re here for a quick purchase or exploring options for your next big buy, our search function is your guide. Give it a try, and discover how easy it is to find exactly what you need.
Frontend Preview (Search Product)
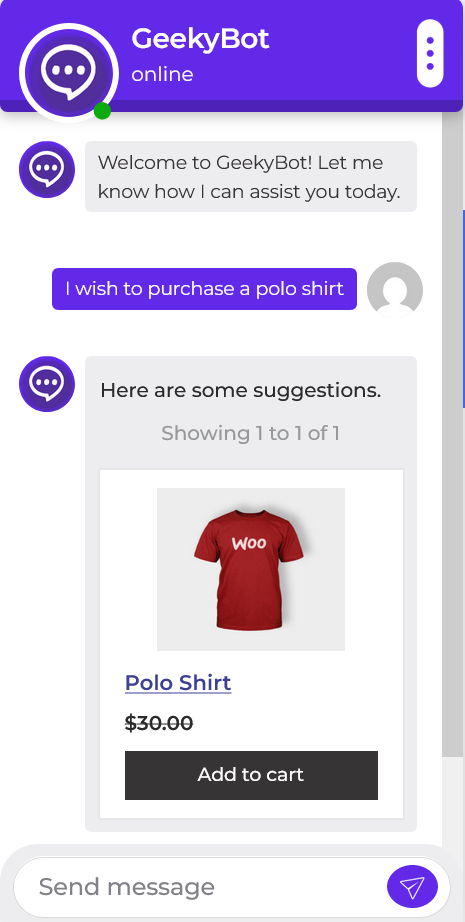
If a user looks for a specific item by name or keyword. This is particularly helpful when users know what they are looking for and want to skip browsing through categories.
Get Products Under Price
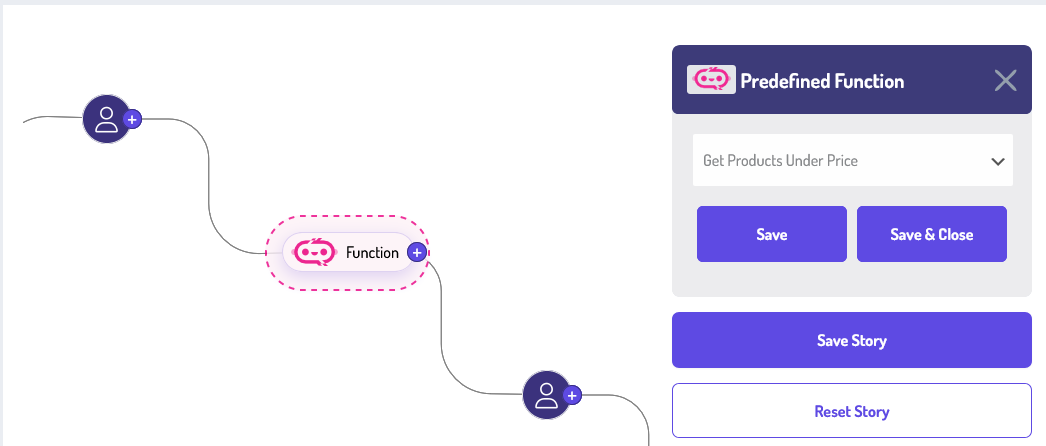
The “Get Products Under Price” function allows users to easily find items that fit within their budget. Instead of browsing through the entire catalog, users can input a specific price limit, and the system will automatically filter and display only those products priced below or equal to that amount. This saves time and makes shopping more efficient, especially when you’re working with a set budget or looking for the best deals.
For example, if you’re looking to buy something under $50, you would enter “Show me products that cost under $50” in the search box. Once submitted, the system returns a curated list of items priced at $50 or below.
If the user has a budget and wants to find products within a certain price range, they can use the “Get Products Under Price” function to prompt them to input a value and then return a filtered list of products that match the criteria.
Frontend Preview (Get Products Under Price)
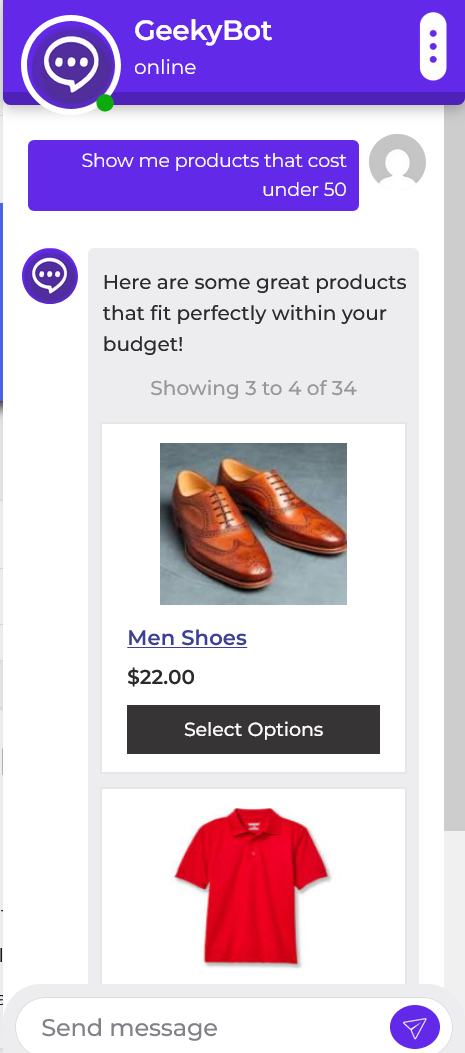
If the user has a budget and wants to find products within a certain price range, they can use the “Get Products Under Price” function and then return a filtered list of products that match the criteria.
Get Products Above Price
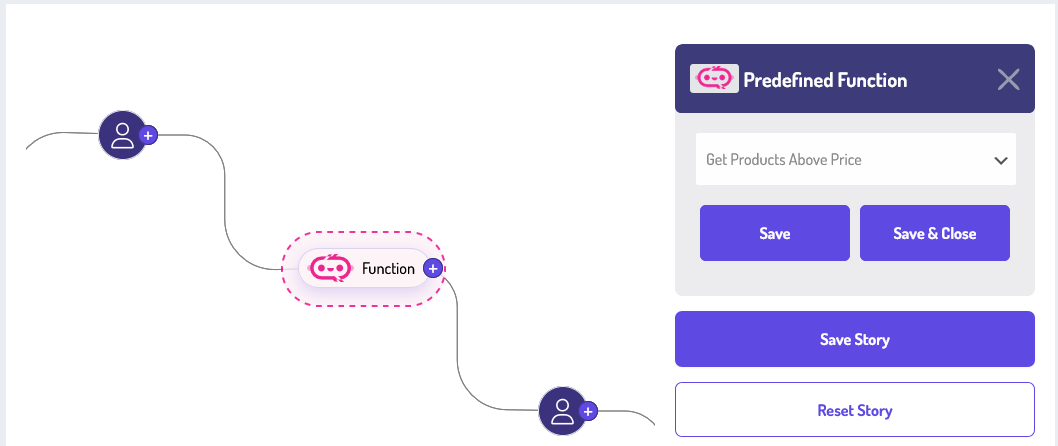
The “Get Products Above Price” function allows users to filter and view only those products that exceed a certain price threshold. This is especially useful when users are interested in premium or high-value items and want to avoid browsing through lower-priced alternatives. Whether you’re shopping for luxury goods, comparing high-end electronics, or just trying to see what’s available in a specific price range, this feature helps narrow down the list to match your intent.
For example, if you’re looking to buy something above $100, you would use this function. You simply enter “show me products that cost above $100,” and the system will return all products priced above $100. This means any product that costs $101 or more will be shown, while items at $100 or below will be excluded from the results. It’s a quick way to refine your search and focus on items that fit your budget expectations or desired quality tier.
The “Get Products Above Price” function enhances the user experience by offering greater control over product browsing. Whether you’re shopping for quality, comparing brands, or staying within a luxury budget, this feature empowers you to discover relevant items faster and more efficiently.
Frontend Preview (Get Products Above Price)

If the user has a budget and wants to find products within a certain price range, they can use the “Get Products Above Price” function and then return a filtered list of products that match the criteria.
View Cart/Remove Items
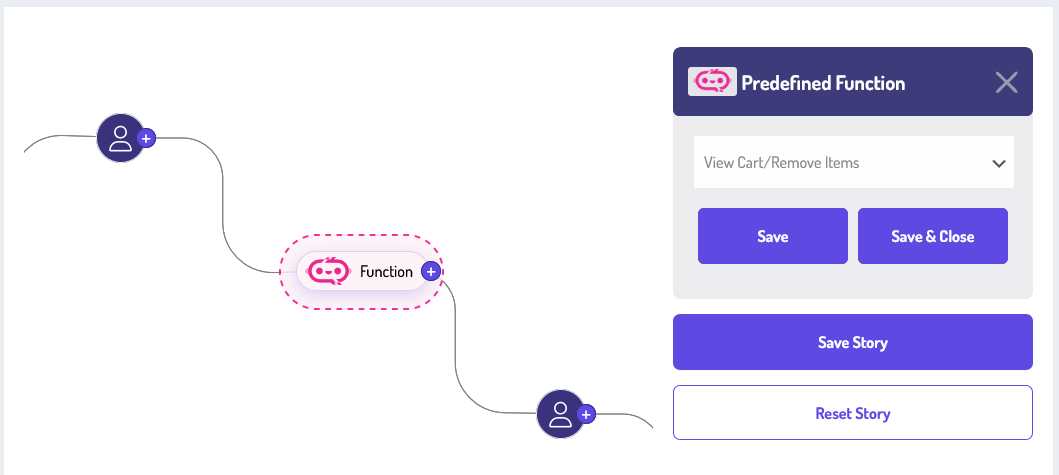
View Cart
The “View Cart” function allows users to review all the items they have added to their cart before checkout. When a user adds a product to their cart while browsing, it gets stored in a virtual basket associated with their session or account. By clicking the “View Cart” button, users are directed to a page where they can see a summary of all selected items. This summary includes product names, quantities, individual prices, and the total cost of all items combined.
Remove Items
Once in the cart view, users can remove items they no longer wish to purchase. Each item in the cart has a “Remove” or trash icon button next to it. Clicking this button instantly removes the item from the cart and updates the total price accordingly. This allows users to easily manage their shopping experience and avoid buying something they didn’t intend to include.
For example, imagine a user is shopping for stationery items and adds three products: a notebook, a set of pens, and a highlighter pack. Later, they realize they already have pens at home. By clicking on “View Cart,” they can see all three items and decide to remove the pen set by clicking the remove icon next to it. The cart then updates to show only the notebook and highlighter pack, and the total cost decreases to reflect the change.
Frontend Preview (View Cart/Remove Items)
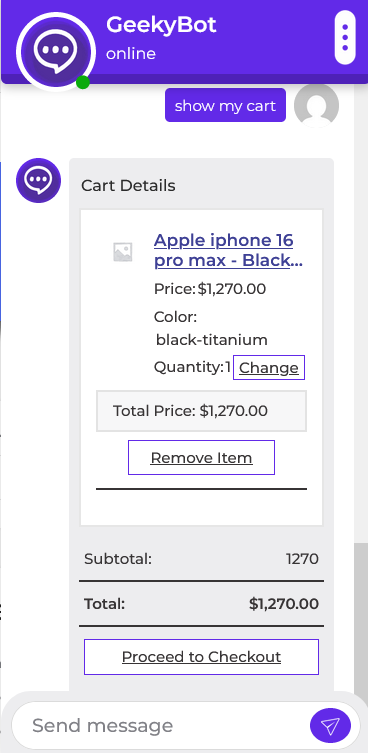
Users can also manage their cart easily through the “View Cart/Remove Items” option. This brings up a summary of the items currently in the cart and provides a way to remove unwanted products before checkout.
Proceed To Checkout
The “Proceed to Checkout” function is crucial to the online purchasing journey. Once users have added items to their cart and are ready to finalize their purchase, clicking the “Proceed to Checkout” button takes them to a secure and guided flow to complete their order. This function streamlines the buying process by gathering essential information in a step-by-step manner, such as delivery address, payment method, and order confirmation.
Frontend Preview (Proceed To Checkout)
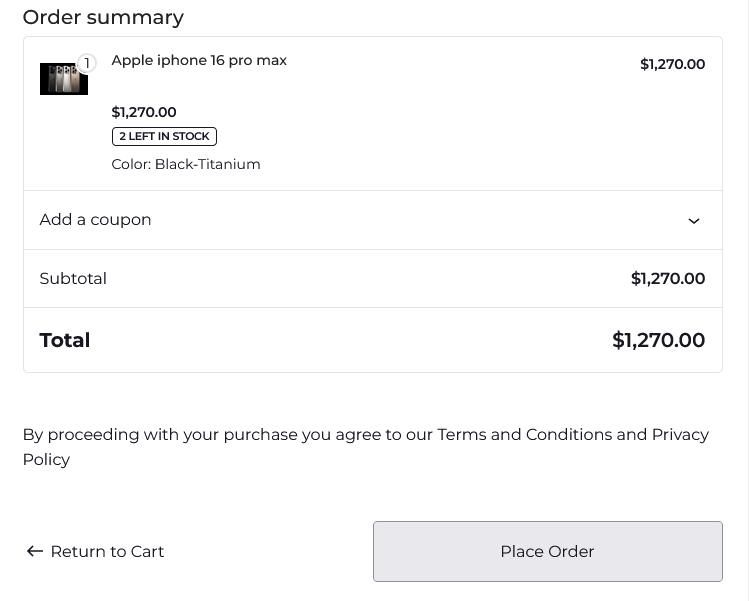
Once they are ready to place the order, selecting the “Checkout” function will guide them through the payment and shipping process, making the transaction smooth and hassle-free.
Mail To Admin With Chat Conversation

The “Mail to Admin with Chat Conversation” feature allows users to directly communicate with the platform administrator by sending an email that includes their chat history. This function is especially useful for reporting issues, sharing feedback, or escalating unresolved conversations. Rather than manually copying messages, users can use this built-in feature to send a full summary of their chat in just a few clicks, ensuring that the admin gets all the context they need.
For example, imagine a user is chatting with a chatbot about a payment issue. After several attempts, the user still feels unsatisfied with the response. They can hit the “Mail to Admin”, and the admin receives an email containing the user’s message and the complete chat history. This helps the admin quickly understand what went wrong without contacting the user again for context.
Frontend Preview (Mail To Admin With Chat Conversation)
The “Mail to Admin with Chat Conversation” feature allows users to directly communicate with the platform administrator by sending an email that includes their chat history. This function is especially useful for reporting issues, sharing feedback, or escalating unresolved conversations.
Addon Base Functions
Additionally, there are some functions marked as “add-on base”. To use these functions must install and activate the “WooCommerce Pro Pack” addon.
Install and Activate The Add-on
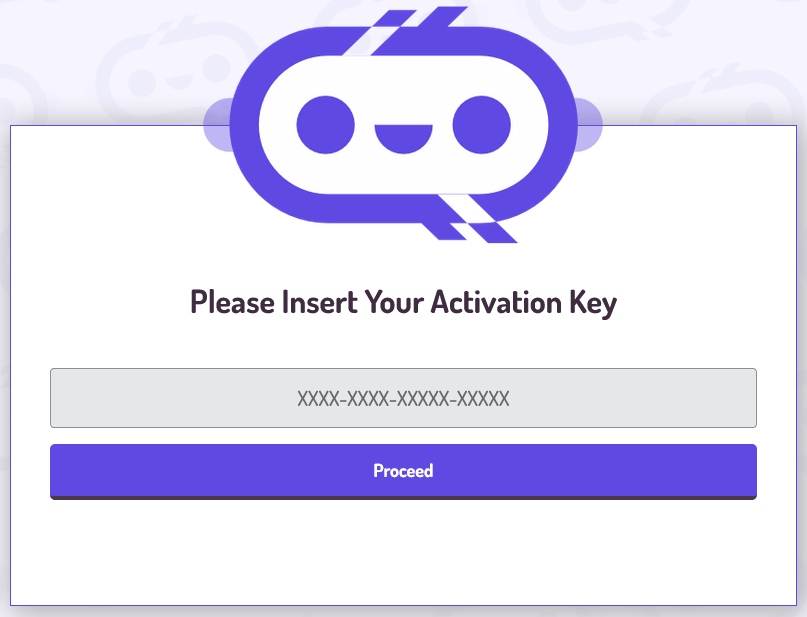
To install and activate the addon, access the addon page, navigate to the Admin Dashboard –> Dashboard Menu –> Install Add-ons. On the install add-ons page, please insert your activation key and click on the proceed button.
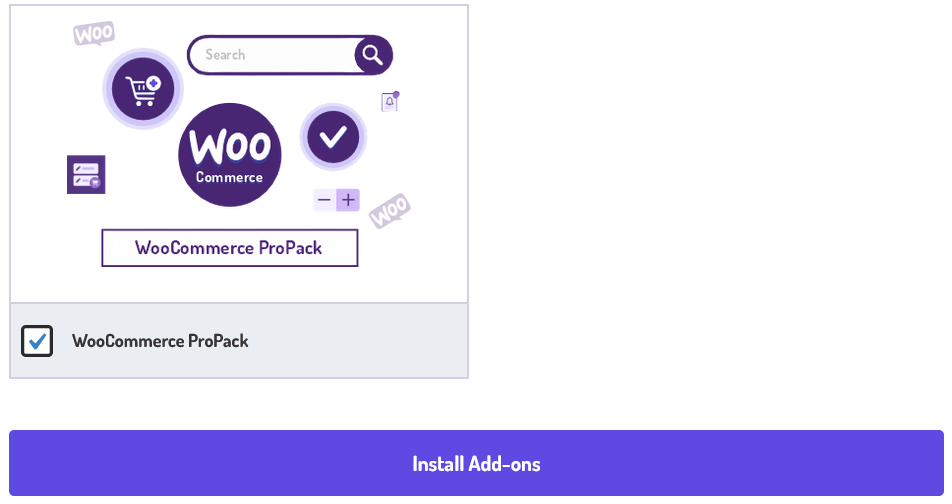
Now select the “WooCommerce Pro Pack” addon from the add-ons listing page and click on the install add-on button.
After installing and activating the “WooCommerce Pro Pack” addon, you will be able to use these functions in your storyboard. The functions are:
- Show All Sale Products
- Show All Trending Products
- Show All Latest Products
- Show All Highest Rated Products
- View Orders
- View Account Details
Let’s describe one by one the functionality of the predefined functions that are listed. First, we talk about the
Show All Sale Products
The Show All Sale Products function is designed to give users a quick and easy way to view every product currently on sale within the store. Instead of browsing through multiple categories or performing repeated searches, users can simply tap this function to see a curated list of discounted items in one convenient place. This feature helps users save time while ensuring they don’t miss out on any special deals or limited-time offers.
For example, imagine a user is browsing to buy clothing. By using the “Show All Sale Products” function. They are immediately presented with a list of sale items, such as a “Men’s Denim Jacket” reduced from its original price.
Overall, the Show All Sale Products function enhances transparency and trust by clearly displaying promotional details. It encourages more browsing and often leads to quicker purchase decisions because users feel they are getting the best available deals. Whether a shopper is hunting for a specific item or just casually looking for bargains, this feature serves as a valuable shortcut to the best offers in the store.
Frontend Preview (Show All Sale Products)
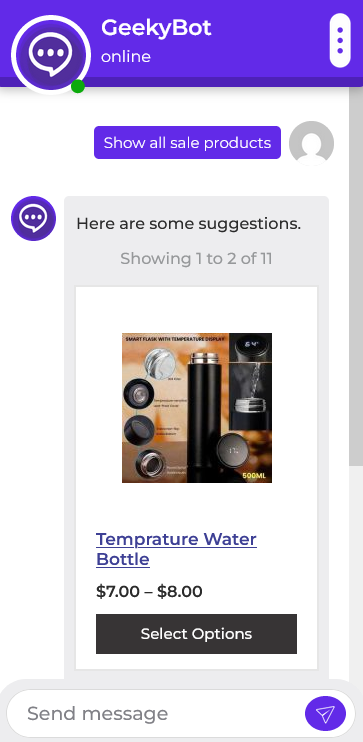
The Show All Sale Products function enhances transparency and trust by clearly displaying promotional details. This feature helps users save time while ensuring they don’t miss out on any special deals or limited-time offers.
Show All Trending Products
The Show All Trending Products feature is designed to give users quick access to the most popular and talked-about items across the platform. When users engage with this function, they are presented with a curated list of products currently gaining significant attention from the community, whether through high sales, social media buzz, user ratings, or frequent searches. This ensures that users are always aware of what’s hot and happening, saving them time and helping them make confident purchasing decisions.
For example, imagine you are visiting our site to shop for home decor. Instead of browsing through hundreds of categories, you can simply search “Show All Trending Products”. Instantly, you’ll see a list of bestsellers like popular throw pillows, stylish lamps, and trending wall art that many users are buying and loving right now. Each item is presented with key details such as price, rating, and customer reviews, helping you make faster and more confident decisions.
In short, the Show All Trending Products function is your shortcut to staying on top of trends without doing all the research yourself. Whether looking for the latest gadgets, fashion must-haves, or seasonal favorites, this feature ensures you are always just one tap away from the most popular and recommended items.
Frontend Preview (Show All Trending Products)
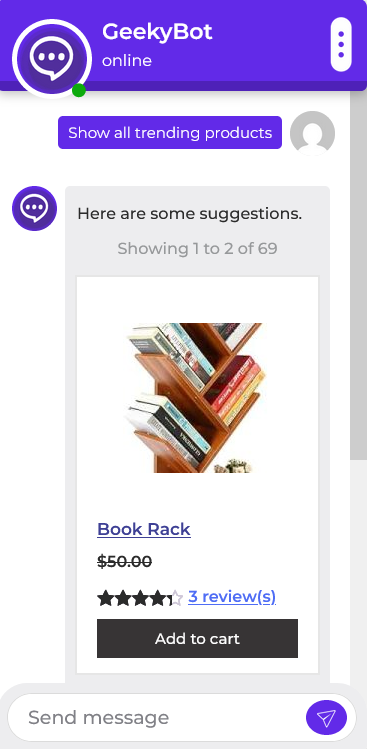
The Show All Trending Products feature is designed to give users quick access to the most popular and talked-about items across the platform. This function is your shortcut to staying on top of trends without doing all the research yourself.
Show All Latest Products

The “Show All Latest Products” function is designed to help users quickly view the newest additions to the product catalog. This feature ensures that users stay updated with the most recent offerings, whether it’s a new collection, seasonal release, or restocked bestsellers. When a user uses or taps this function, they are immediately presented with a list or grid of products that were most recently added to the inventory. The system retrieves and displays products based on their upload or release date. Typically, the list is arranged in descending order, meaning the most recently added items appear at the top. This ensures users always see the freshest products first.
Consider an example: If a user visits your site and wants to view all the latest products. When a user uses this function, there is no need to browse through multiple categories. The system fetches and displays a comprehensive list of the most recently launched or updated products across all categories. The user can quickly compare the newest products and make faster purchasing decisions.
The “Show All Latest Products” function streamlines the shopping experience by highlighting what’s new. It caters to returning users who want to see only the latest inventory, enhances product discovery, and can drive engagement by spotlighting fresh or limited-time items.
Frontend Preview (Show All Latest Products)
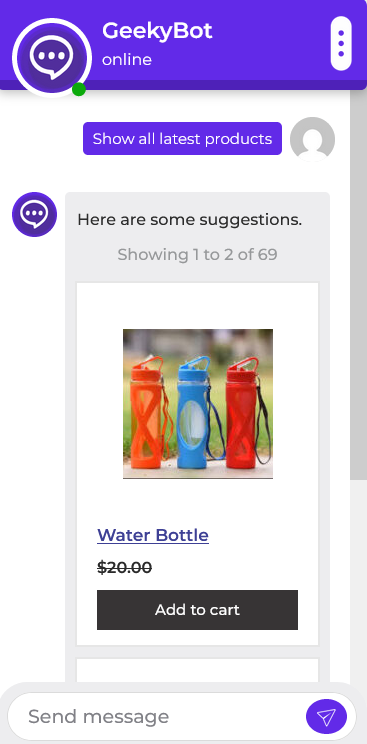
The “Show All Latest Products” function is designed to help users quickly view the newest additions to the product catalog. This feature ensures that users stay updated with the most recent offerings, whether it’s a new collection, seasonal release, or restocked bestsellers.
Show All Highest Rated Products

The “Show All Highest Rated Products” function is designed to help users quickly find the best products based on customer ratings. When a user uses this option, the system filters through the entire catalog and displays only those products that have received the highest ratings from verified buyers. This helps save time by surfacing top-performing items without requiring users to search through numerous listings manually. The feature typically defines “highest rated” by looking at the average rating (typically out of 5 stars) and the number of reviews to ensure reliability.
For example, a product with a 4.9-star rating from 1,200 reviews will be prioritized over a 5-star rated product with only 3 reviews. Let’s say a user is shopping for wireless headphones. Upon using this feature, instead of seeing hundreds of products ranging from 2 to 5 stars. This reduces the decision-making burden and enhances the shopping experience.
Overall, “Show All Highest Rated Products” empowers users to quickly make confident, informed decisions by surfacing the most loved and trusted items. It enhances transparency and trust in the platform while simplifying the path to purchase.
Frontend Preview (Show All Highest Rated Products)
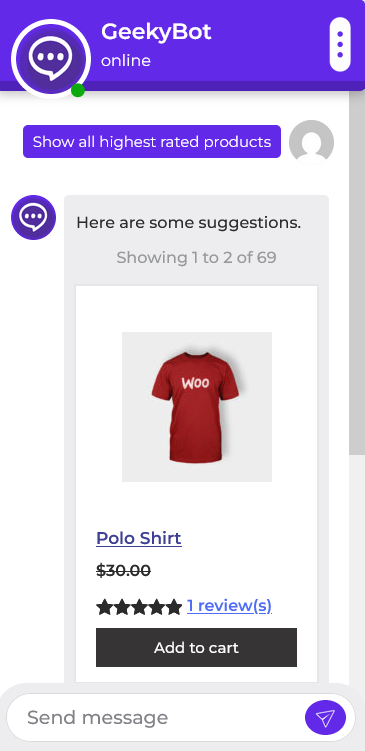
The “Show All Highest Rated Products” function is designed to help users quickly find the best products based on customer ratings. When a user uses this option, the system filters through the entire catalog and displays only those products that have received the highest ratings from verified buyers.
View Orders
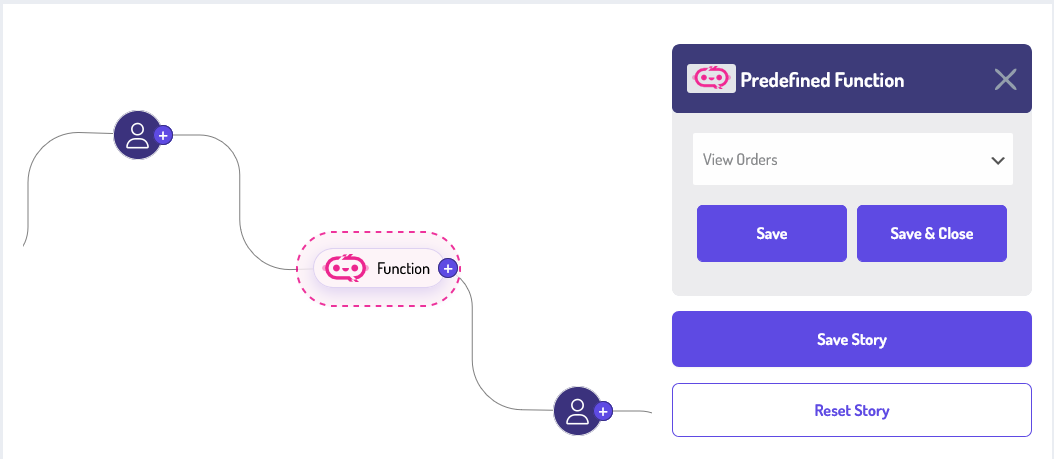
The “View Orders” function allows users to quickly access and review all their past and current orders. This feature is designed for clarity, convenience, and control, enabling users to keep track of what they’ve purchased, monitor order statuses, and re-order items when needed.
When a user uses the “View Orders” function, they are presented with a list of all orders placed under their account. Each order entry typically includes a summary: the order ID, total amount, and current status (e.g., Processing, Shipped, Delivered, or Cancelled).
Frontend Preview (View Orders)
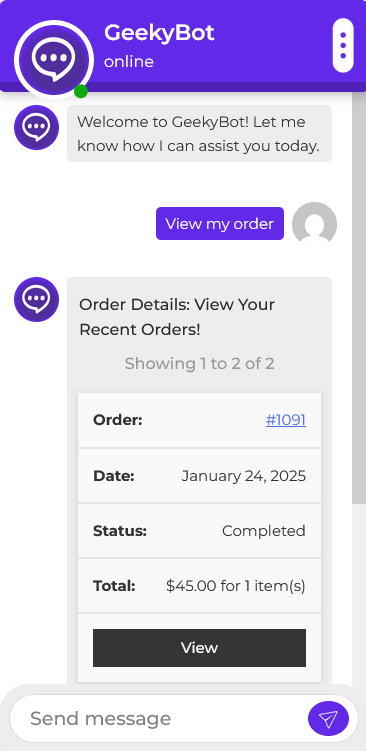
When a user uses the “View Orders” function, they are presented with a list of all orders placed under their account.
View Account Detail
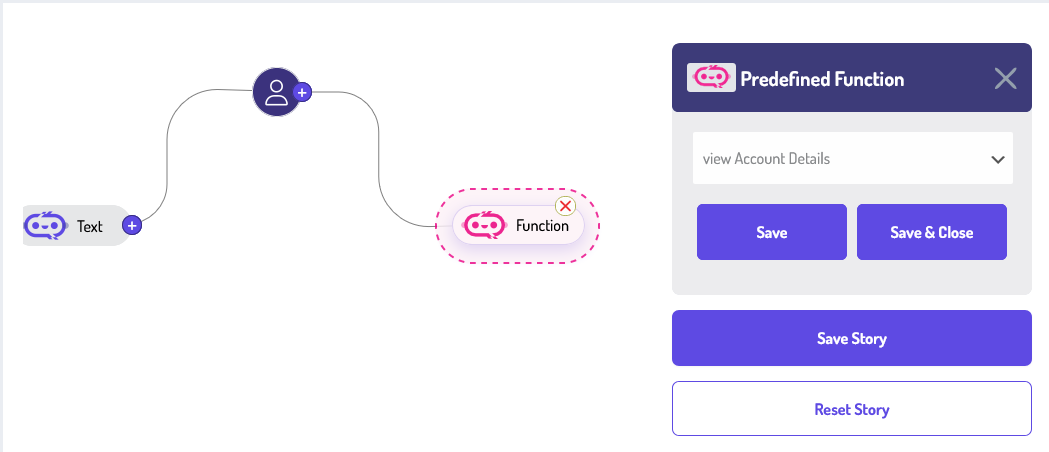
The “View Account Detail” function allows users to access comprehensive information about their account in a centralized and easy-to-understand format. The “View Account Detail” function allows users to access comprehensive information about their account in a centralized and easy-to-understand format. When a user selects this option, they are taken to a screen that displays a summary of their personal and account-related information. This includes their full name, email address, billing address, and shipping address.
Frontend Preview (View Account Detail)
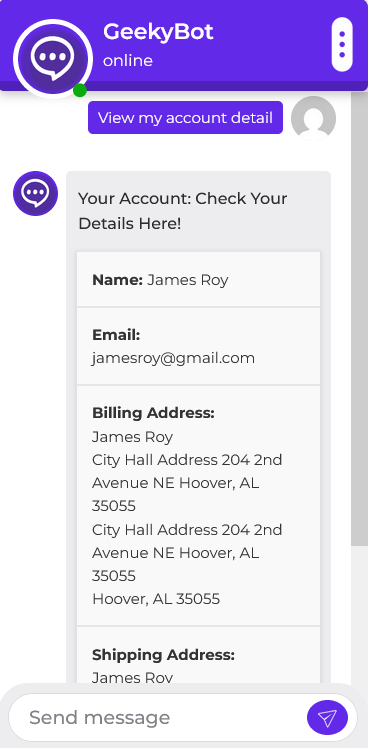
The “View Account Detail” function allows users to access comprehensive information about their account in a centralized and easy-to-understand format. This includes their full name, email address, billing address, and shipping address.