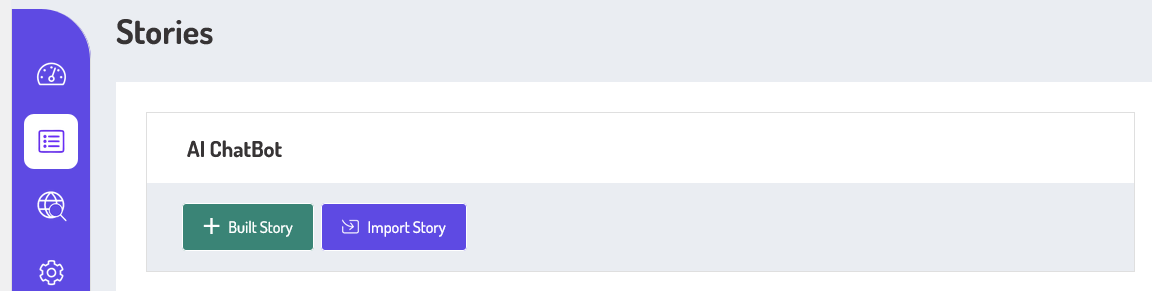
AI Story In The GeekyBot!

To access the AI Story detail page, navigate to the Admin Dashboard–> Dashboard Menu–> Stories–> click on the story title from your admin dashboard. On the AI Story page, you will find various options for the admin to manage the AI Story.
This page provides us with details about the AI Story, which contains user inputs, bot responses, predefined functions, and fallback messages. There is also an option to search and filter stories by various criteria (NLP and simple). After managing the AI Story according to your requirements, click on the “Save Story” button. Your AI Story has been successfully saved. Click on the reset story button to remove all user inputs and bot responses from the AI Story Board.
Search (NLP & Simple)
In our platform, we offer two powerful ways to find and interact with storyboard content: Natural Language Processing (NLP) and Simple Search. Both tools are designed to help you quickly locate relevant information, but they function quite differently under the hood.
By offering both NLP and simple search, we give you the flexibility to search in the way that suits you best. Use simple search for quick, targeted queries and turn to NLP when you’re exploring a topic more conversationally or conceptually.
Search With NLP

An NLP (Natural Language Processing) search engine understands queries in everyday language. Natural language processing (NLP) focuses on the relationship between human language and machines based on the use of natural language. Natural language search isn’t based on keywords like traditional search engines, and it picks up on intent better since users can use connective language to form full sentences and queries.
Here’s an example of a traditional search query:
Catskill Mountains height
And then reformatted as a natural language query:
How high are the Catskill Mountains?
Search With Simple

Simple Search is a keyword-based search system. A simple search matches exact keywords in your storyboard content. When you type in a query, the system looks for exact or partial matches of those words in the text. It doesn’t understand the meaning or context, just the presence of words. For example, searching for “marketing strategy” will return all results containing those exact words. When the admin uses a filter, only storyboard content that fulfills the provided criteria will be shown, and the reset button will disable the filter criteria.
AI Story Board and Action
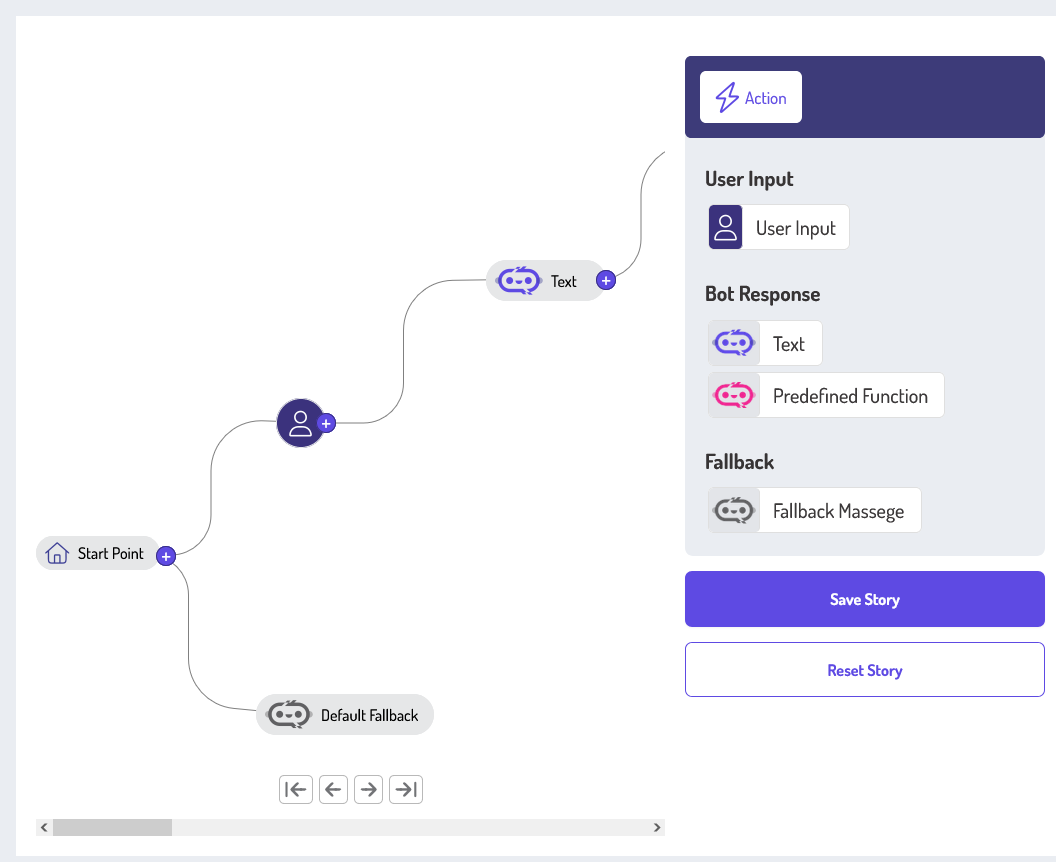
The storyboard can break down your vision into clear visual steps. It’s like having a digital whiteboard that understands your words and turns them into visual panels. You can edit each frame and add dialogue. This portion represents a storyboard and its actions. On the right side of the storyboard, the actions are ( User Input, Bot Response, Predefined Function, and Fallback Message ). Admins can create a story by dragging and dropping these actions on the storyboard according to their requirements. There is a starting point at the storyboard where you can start to create the story.
Action
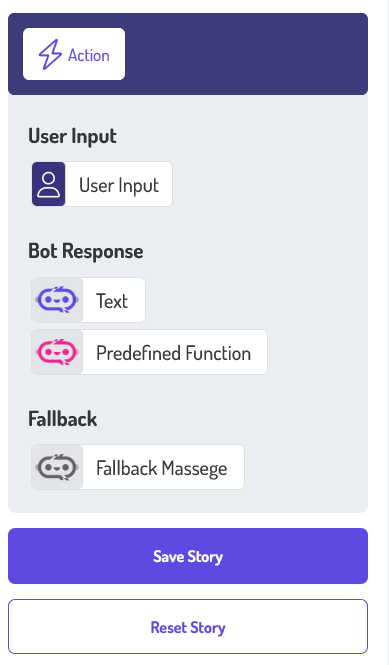
This portion represents some actions the admin can use to create a story. The actions are User Input, Bot Response (Text, Predefined Function), and Fallback Message.
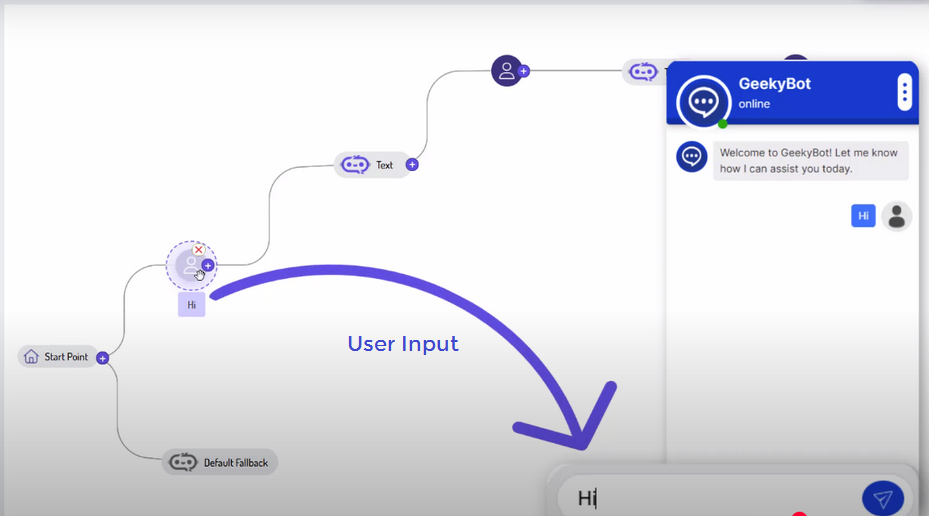
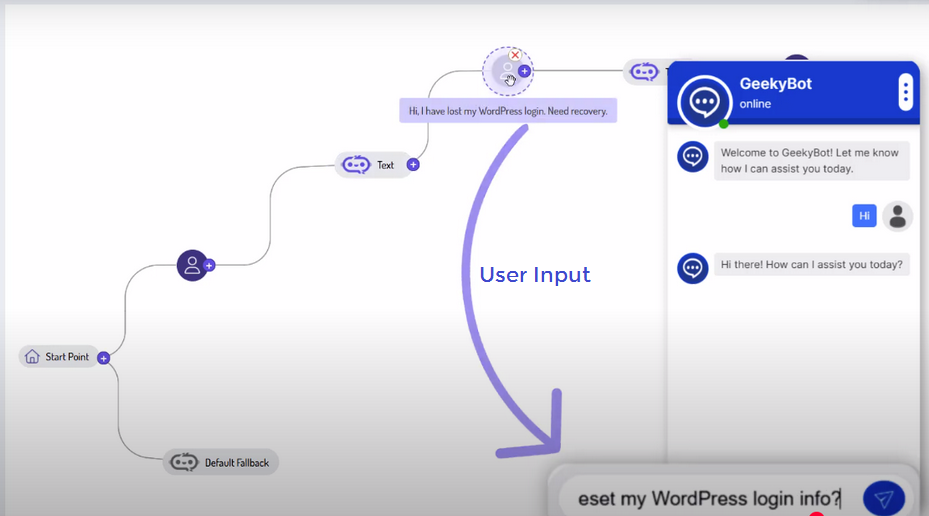
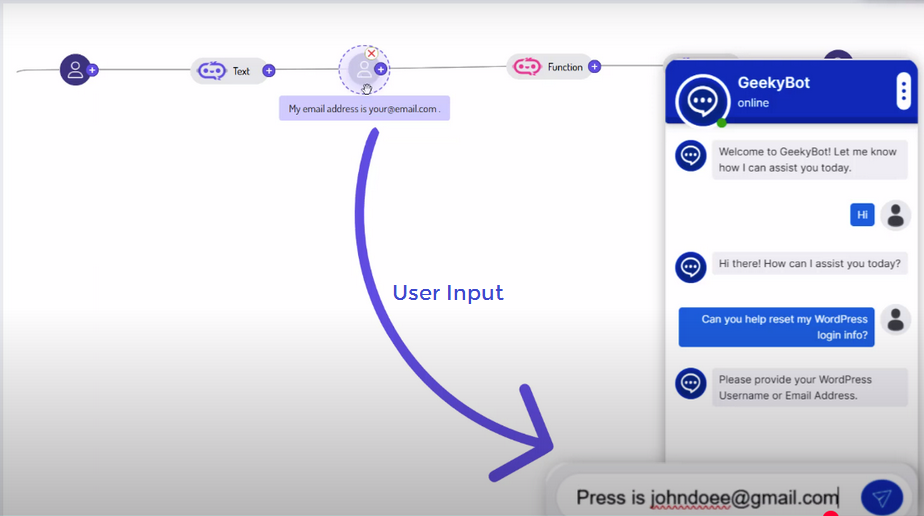
User Input
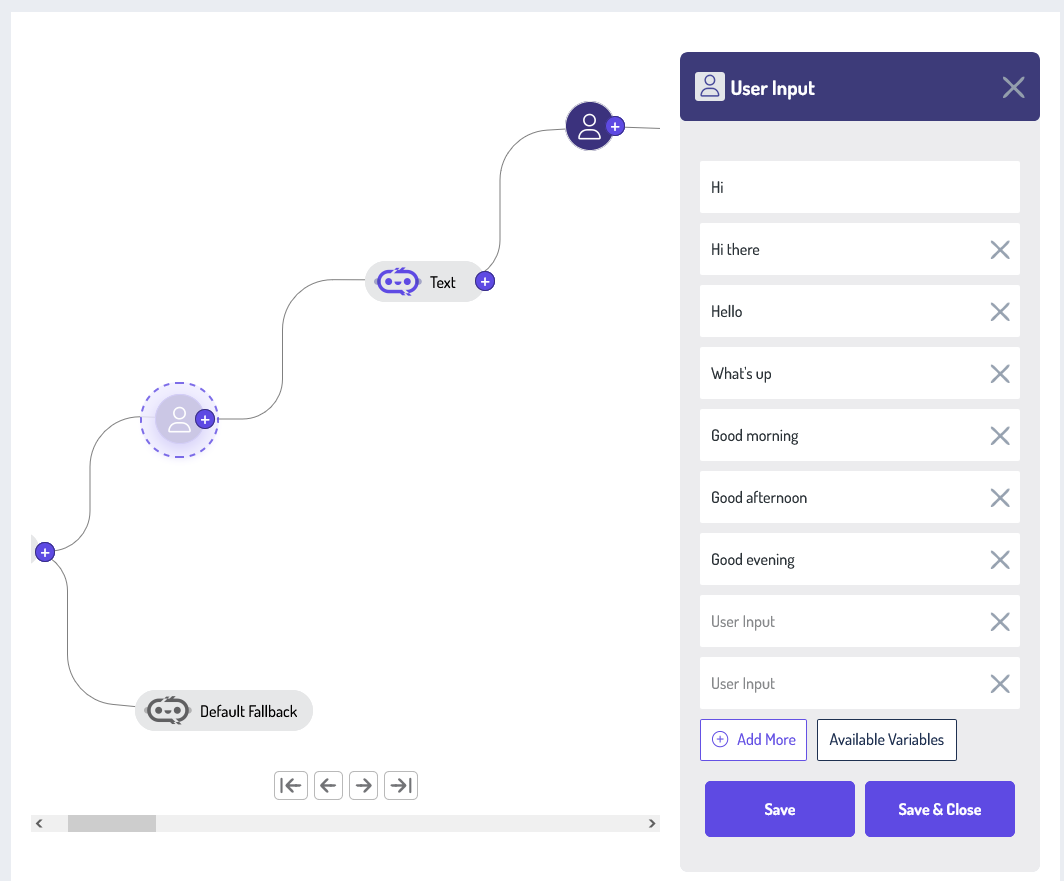
Admin can create the story by dragging and dropping the user input on the AI Story Board. After selecting the user input from the storyboard, your inputs should provide clear instructions on what actions the bot should take and what actions it should avoid. This includes guiding what types of questions or requests the bot can handle and what it cannot. When writing your story, consider the user’s perspective. What problem are they trying to solve? What language do they use? What kind of personality do they have? By taking these factors into account, you can create a story that resonates with your users.
There are two buttons on the right side: add more and available variables. You can add more input values by clicking on the Add more button.
Frontend Preview
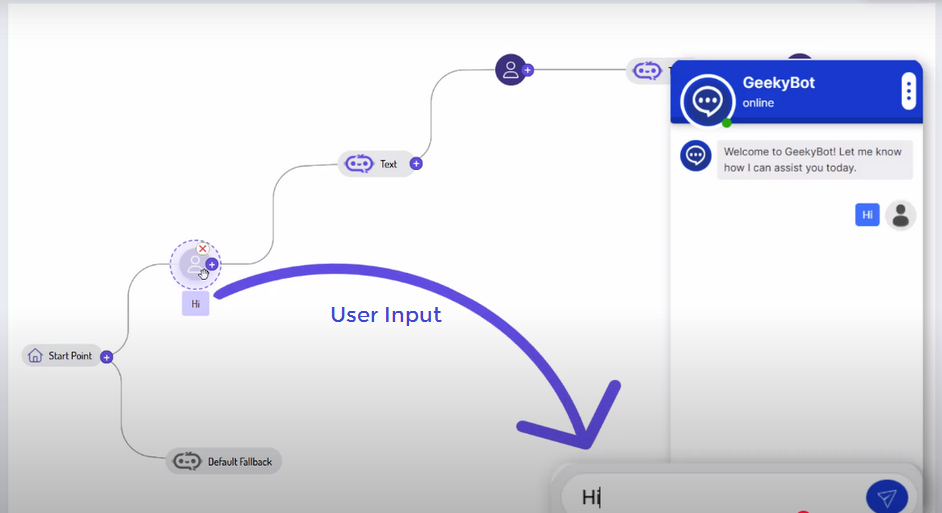
The interaction between a user and a chatbot. The user sends a message to say “Hi”. The message that is sent by the user is called “User Input.”
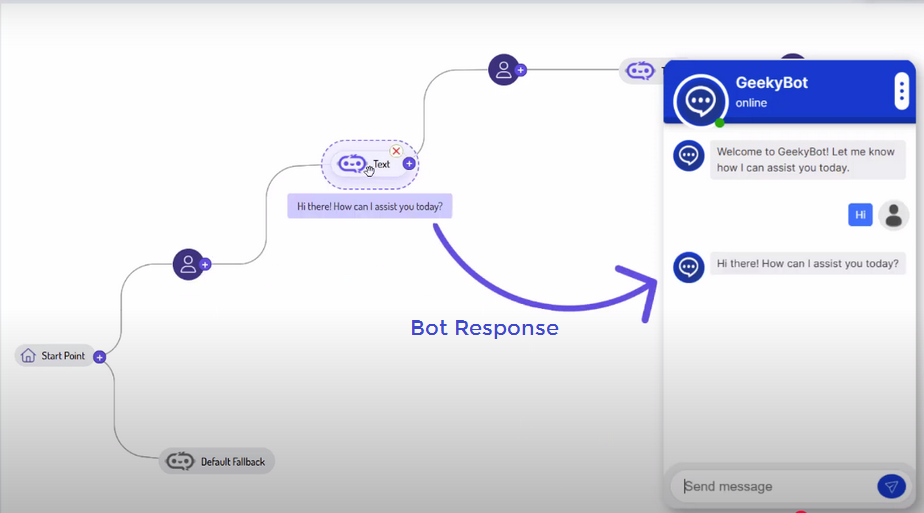
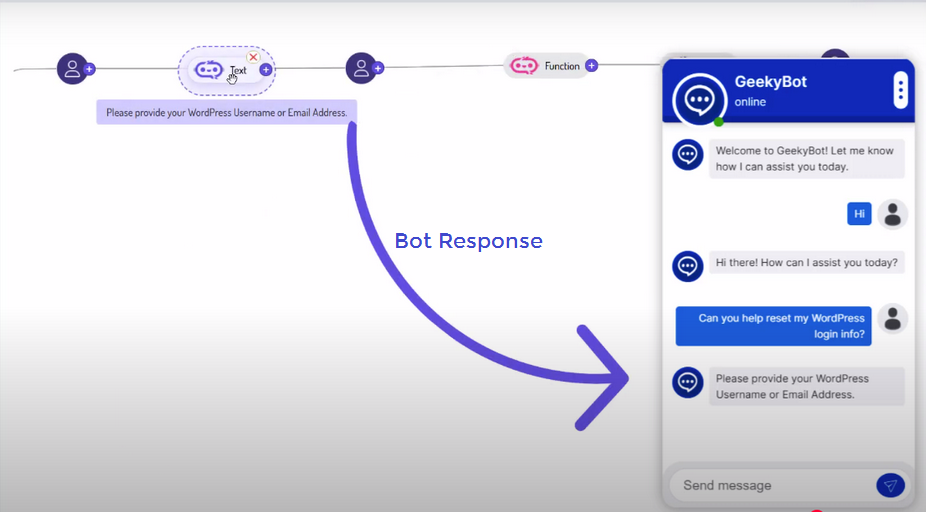
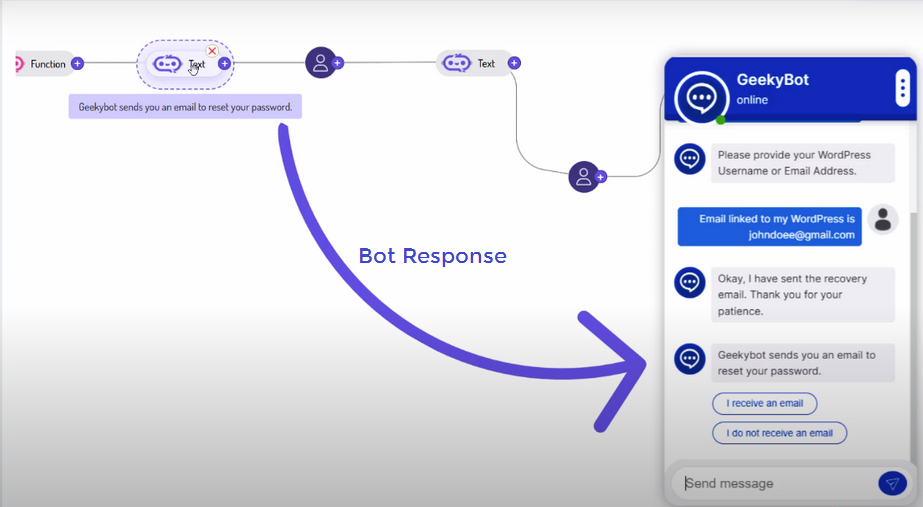
Bot Response
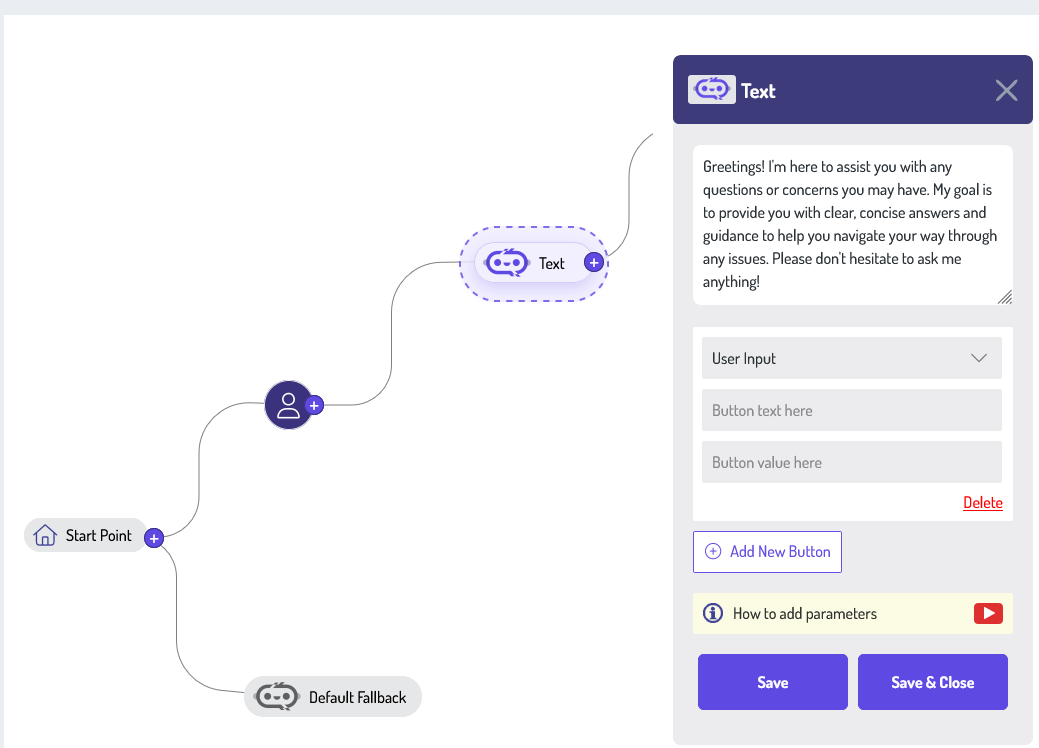
The admin can create the bot response by dragging and dropping the bot text on the AI Story Board. After selecting the bot response from the storyboard, your bot response should be concise and to the point. Avoid lengthy or irrelevant information that may confuse or frustrate the user. Stick to the key points that are essential for the user’s understanding. The tone of your bot response should match the personality of your conversational chatbot. If your bot is meant to be friendly and helpful, the tone should be warm and welcoming.
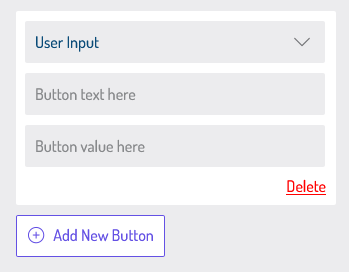
There are options to add buttons/links in bot responses. Click on the Add New button. The form will appear on the screen. We will provide all the necessary details for adding buttons/links in the bot response.
- There is a drop-down field to select the button or link option.
- Enter the button/link title.
- Set the button/link value.
- Click on the delete link to remove the button.
- You can add multiple buttons by clicking on the Add New Button.
Once you are done with the bot response, hit the save button. The bot response has been successfully saved.
Frontend Preview
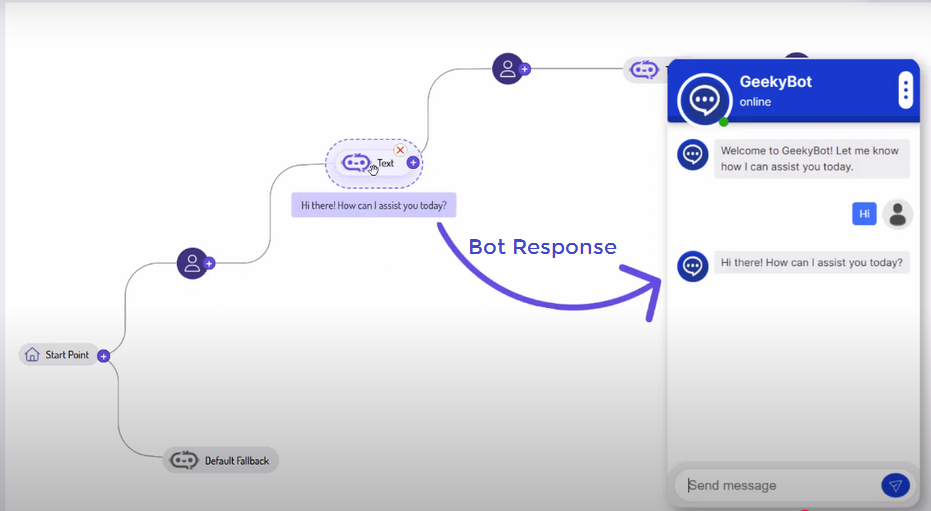
ChatBot responds to the user input with the message: “Hi! There, how can I assist you today?”.
Available Variable
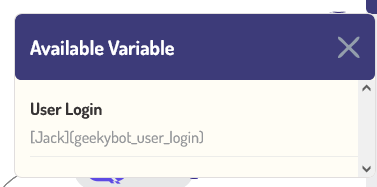
In your storyboard, variables are a powerful way to personalize and control the flow of your story. A variable is like a container that holds a piece of information. This could be a number, a name, a choice made by the user, or even a status (like “visited” or “completed”). By using variables, your story can respond dynamically to the user’s actions and decisions, creating a more interactive and customized experience.
When you click on the available variables button, a pop-up will appear on the screen that shows all the available variables in the system. You can use these variables according to your requirements. Once you are done with the inputs, hit the save button. The user inputs have been successfully saved.
Predefine Funcations
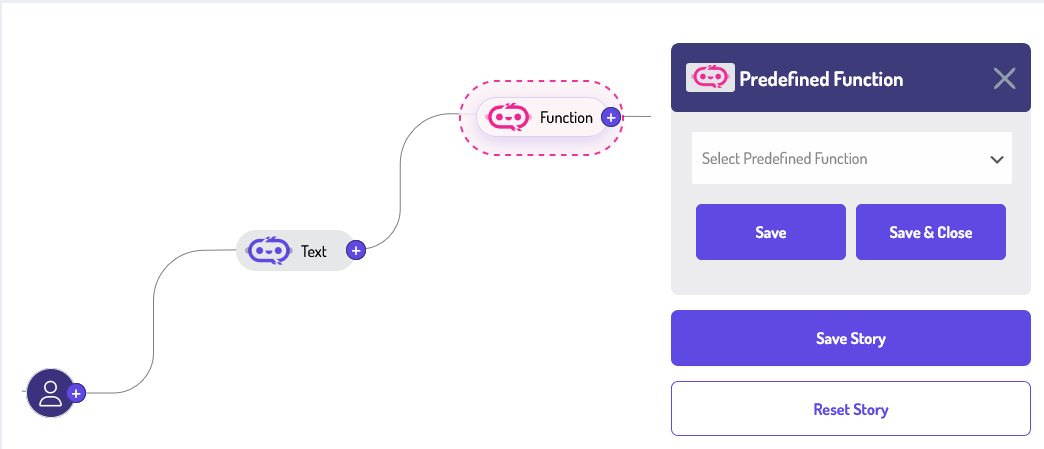
In your storyboard, predefined functions are like shortcuts that you can use to create dynamic, responsive, and engaging stories with minimal effort. They’re designed to make your storyboard experience smoother and more intuitive. For example, suppose you’re building an interactive story where a character needs to greet the user. Instead of manually writing out the logic for handling different greetings depending on the time of day, you can simply use a predefined function like getGreeting(). This function might return “Good morning,” “Good afternoon,” or “Good evening” based on the system time.
Admin can use functions by dragging and dropping the predefined function onto the AI Story Board. After selecting the function from the storyboard, you can set the function according to your requirements. All available functions are listed in the drop-down menu.
Fallback Message
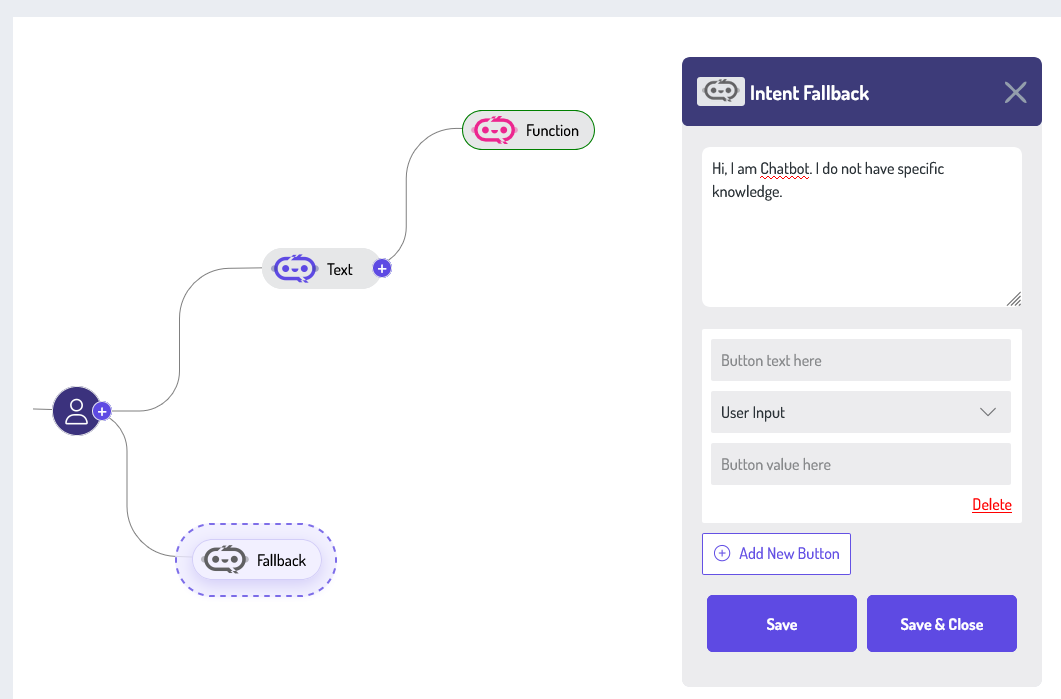
It’s the chatbot, there are moments when the system may not understand what the user is trying to do. This could be due to unclear input, an unexpected error, or a missing piece of information. In such cases, a fallback message steps in as a safety net. It acts like a polite, helpful assistant who gently guides the user back on track, rather than letting them hit a dead end or experience confusion.
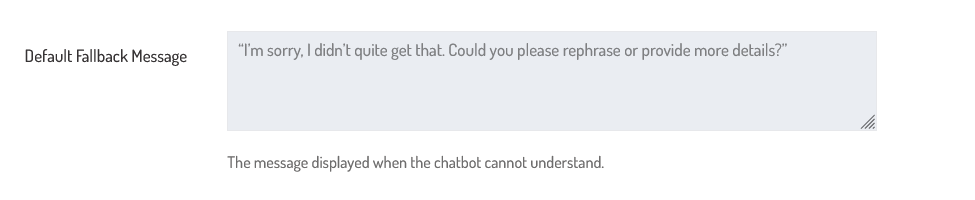
For example, imagine you’re chatting with a bot and you type, “Book me a ticket to the concert with the sparkly lights.” If the chatbot doesn’t understand what “sparkly lights” refers to, it might respond with: “I’m sorry, I didn’t quite get that. Could you please rephrase or provide more details?” This is a fallback message in action. It’s graceful and non-intrusive and keeps the user engaged.
Admin can create the fallback message by dragging and dropping the fallback at the AI Story Board. You can use multiple fallback messages anywhere in the storyboard after the user inputs. After selecting the fallback from the storyboard. You can write your fallback message in the text area. Your fallback message should be concise and to the point. The message is displayed when the chatbot cannot understand the user’s input. Customizes the action button displayed with the fallback message when the chatbot doesn’t understand user input.
Following these tips, you can create a compelling story that sets the tone for your conversational chatbot. Remember to consider the user’s perspective and provide clear instructions for their interactions with your bot.
Fallback Configuration
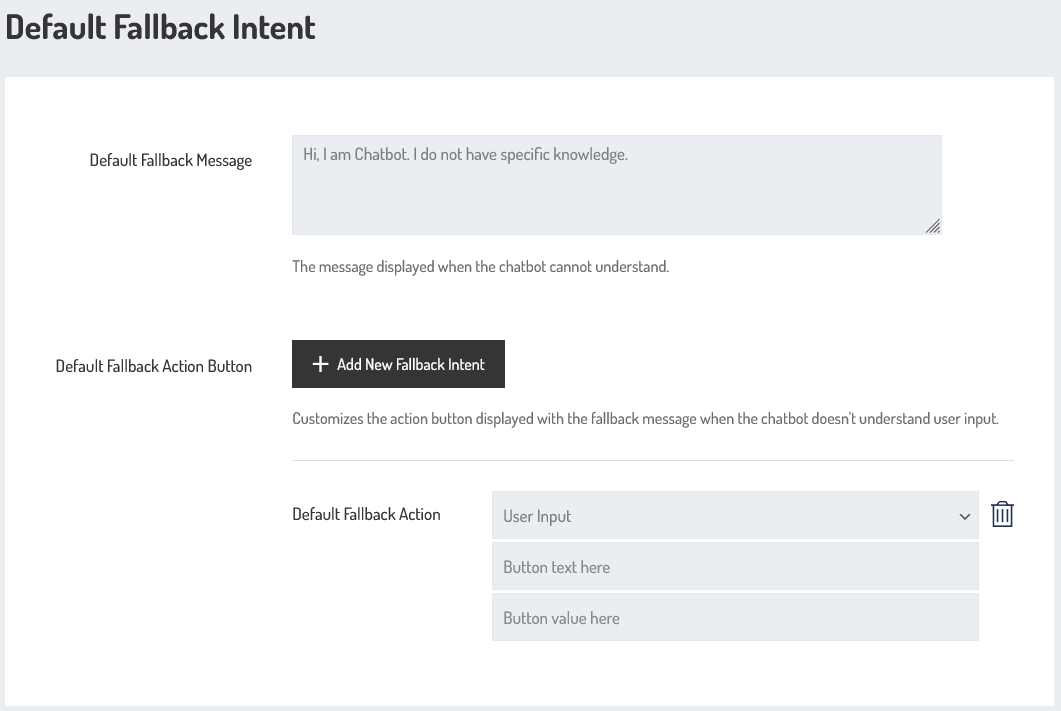
As an administrator, navigate to the Admin Dashboard–> Dashboard Menu–> Settings–> Default Fallback Intent. On the configuration page, you will find the fallback configuration that the admin can use to manage the fallback message that affects both the admin and frontend side.
Default Fallback Message
Admin can write a default fallback message in the text area. When no fallback message is added to the storyboard, then this default fallback message will be displayed on the front-end side. This message displays due to unclear input, an unexpected error, or a missing piece of information.
Default Fallback Action Button

This image appears to be from a chatbot configuration interface, specifically for setting up a Default Fallback Action Button. Here’s a breakdown of what each element likely does:
-
“Add New Fallback Intent”: Lets you define a new intent that should be triggered when the bot doesn’t understand the user’s input.
“Default Fallback Action” section:
- Dropdown (“User Input” ): This lets you select the type of fallback action the button triggers (options could include user input, redirect to an intent, open a URL, etc.).
- “Button Text Here”: This is a Placeholder for the text that will appear on the fallback action button shown to the user.
- “Button Value Here”: This is a Placeholder for the value or payload sent when the button is clicked.
- “Delete”: Click the delete icon to close the default fallback action button.
Variables
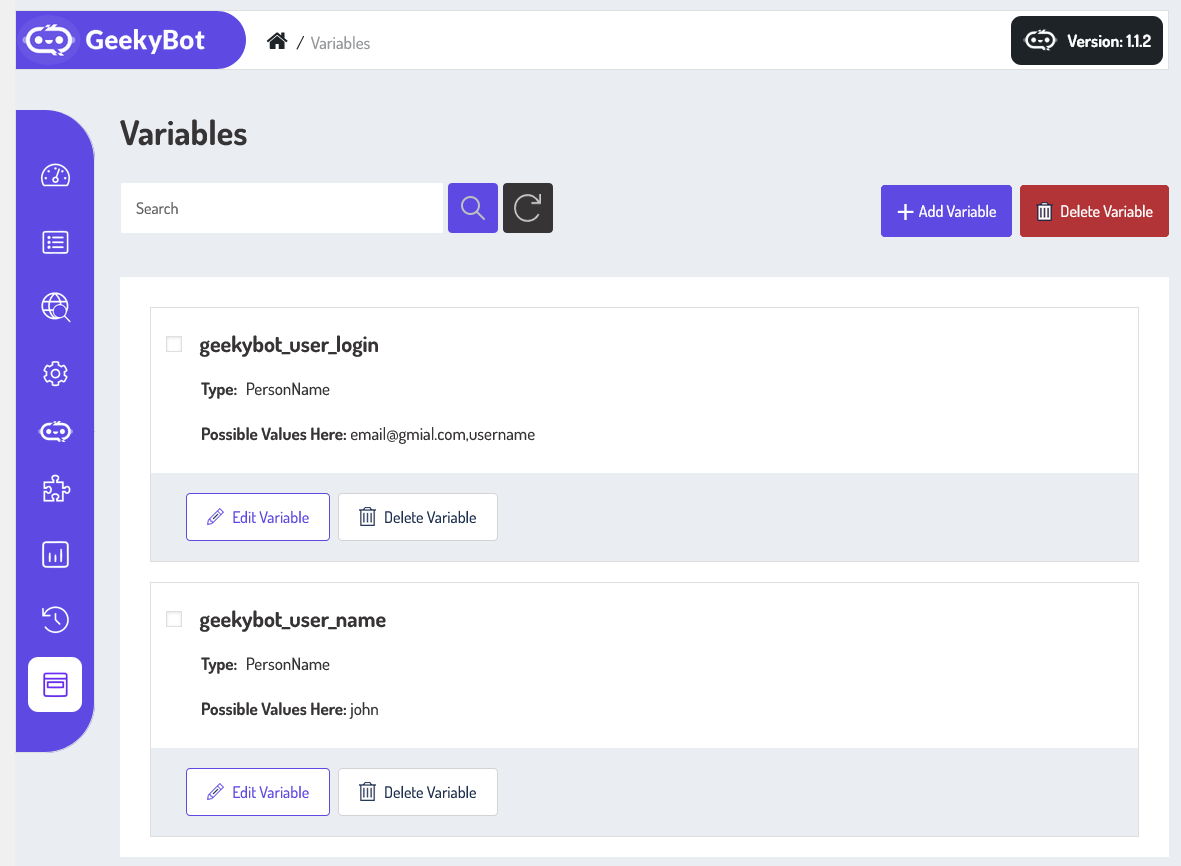
From your admin dashboard, navigate to the Admin Dashboard –> Dashboard Menu –> Variables. On the Variables page, you will find various options for the admin to manage the Variables.
It displays a list of variables added by the admin. Each variable has a name, type, and possible values. It includes search and filter variables by name criteria. There are buttons for various actions like edit variable and delete variable. Additionally, there’s an option to “Add Variable” at the top right of the “Variables” page.
- Manage Variables:
- Buttons for various actions like
- Edit Variable: Modify the variable details.
- Delete Variable: Remove the variable from your list.
- Buttons for various actions like
The action button at the top right allows the admin to delete single or multiple variables (using checkboxes).
Add New Variable
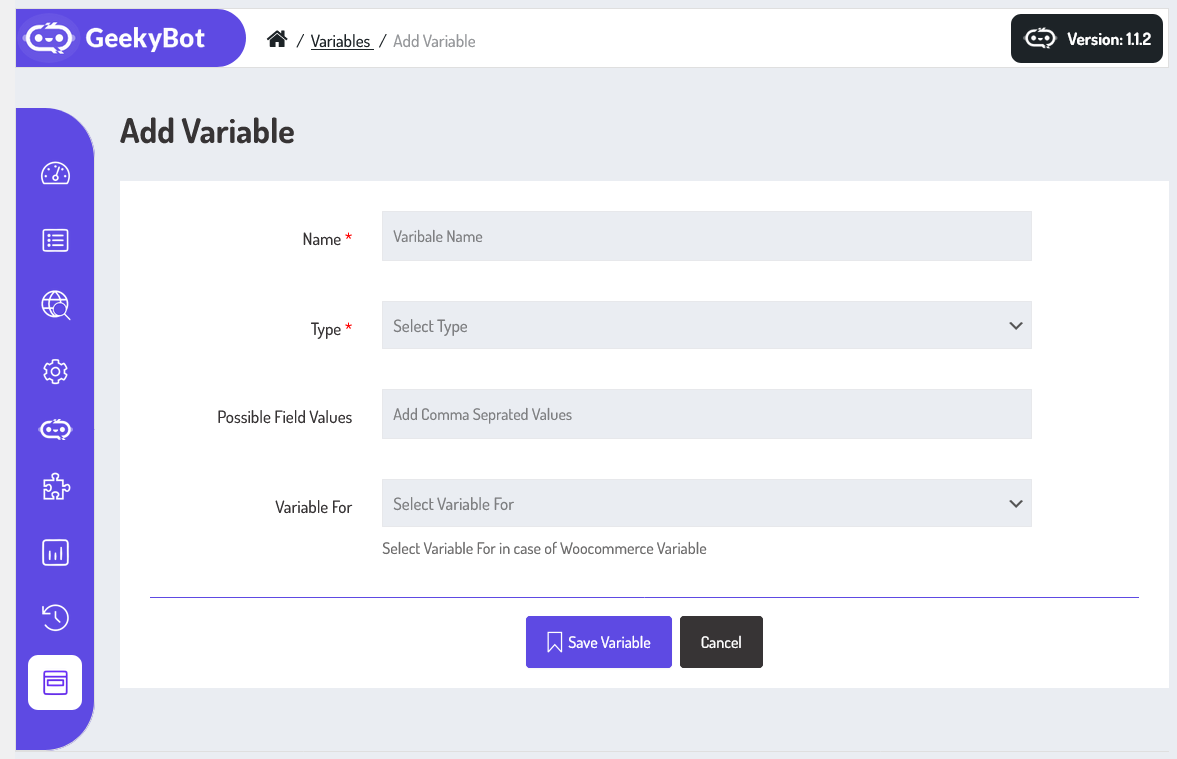
Now, let’s walk through the step-by-step process of adding a variable from the admin end. From your admin dashboard, navigate to the Admin Dashboard –> Dashboard Menu –> Variables –> Add New Variable to start the process of creating a variable effectively. On the ‘Add Variable’ form, we will provide all the necessary details for creating a variable. Now, let’s go through the details required to add a variable from the admin perspective. We’ll cover each aspect,
- Name: Name is a required field to enter the variable name.
- Type: Specify the type of variable. All available types are listed in the drop-down.
- Possible Field Values: Set the possible field values for the variable and add comma-separated values.
- Variable For: There are two options to select a variable for: Product and Attribute. If you select the variable for Woocommerce, then you select the “Product”; otherwise, you select the “Attribute”.
The form also includes buttons at the bottom to “Cancel” or “Save Variable“. Once all these details are filled in and you hit the save button, your variable will be successfully saved.
How To Use Variables In Storyboard
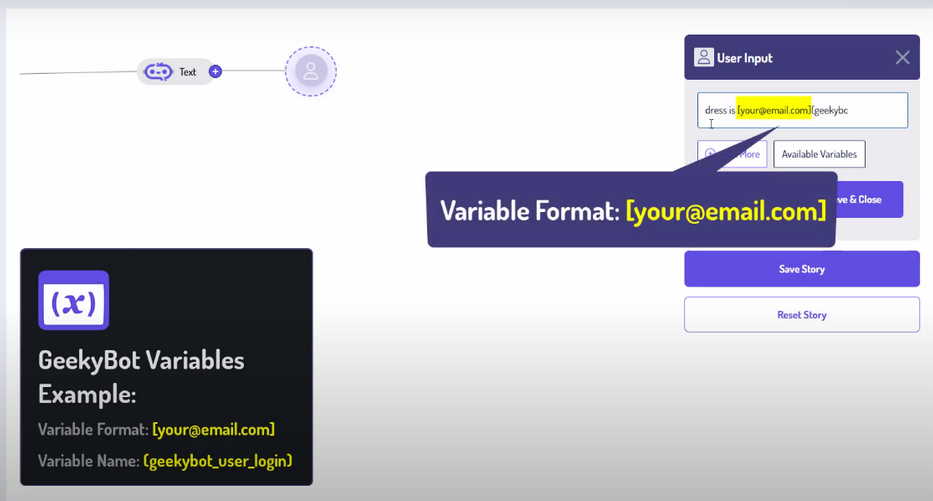
This portion describes the variable format. Admin can use the variable in the storyboard by using this format.
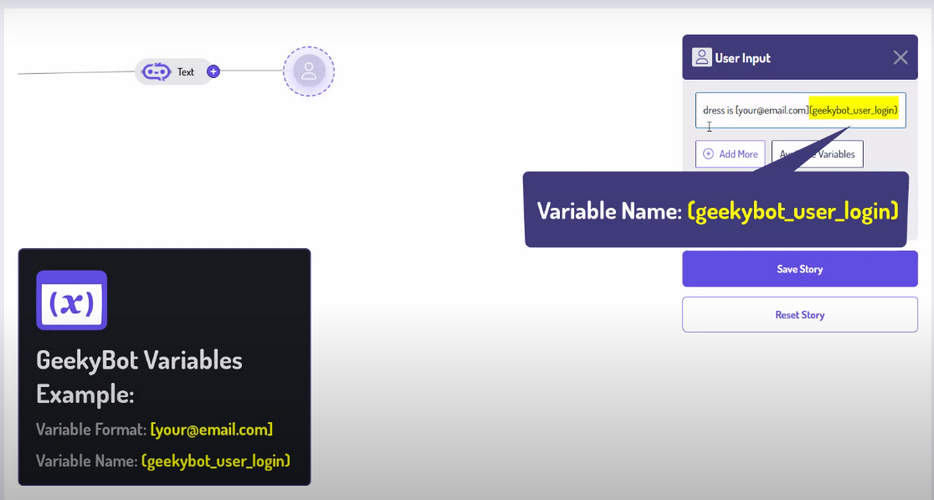
To use a variable, you first need to define it. For example, you might create a variable called {{emailAddress}} to store the email address entered by the user. Once defined, this variable can be reused throughout the story. If the user types “[email protected],” the story can later refer to that email by calling the variable.
Variables make your storyboard flexible and interactive. You can use them to store information such as names, locations, preferences, scores, or any other data point relevant to your story. Once a variable is set, you can reference it multiple times throughout the storyboard to create a sense of continuity and personalization.
Conversation Between User and Chatbot
A conversation refers to the interaction between a user and a chatbot. It includes exchanges of text forms of communication. Conversations have an associated storyboard. The storyboard defines the overall personality and abilities of the chatbot. During a conversation, the chatbot uses storyboard data to serve the user.
The key component of a conversation is the message. Messages can be of various types, but the most common ones are the “user” message and the “bot” message type. The “user” message type is all chat messages submitted by the user, while the “bot” message type is all chatbot responses. When you interact with a chatbot, you are building a list of conversation messages.
Consider the following example, which describes the basic conversation flow entirely structured around the ChatBot.
User Input
Bot Response
User Input
Bot Response
User Input
Bot Response
Export Story
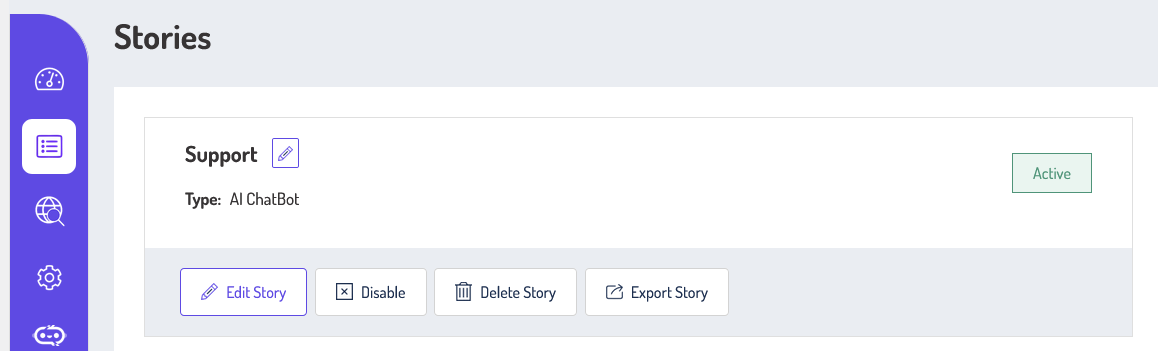
It represents an individual story, it has a story name, type (AI ChatBot), and story status (e.g., “Status: Active”). There are options to edit, enable/disable, delete, and export the Story. But here we talk about the export story.
The Export button allows you to easily save your story outside of this platform. When you click on it, the system compiles your content text and any other included elements into a downloadable file format. The goal is to give you a clean, readable version of your story that’s ready to use elsewhere. This makes it ideal for authors who want to keep a backup copy of their work. If you make changes to your story later, simply return and export it again to get the most up-to-date version.
How The XML File Works
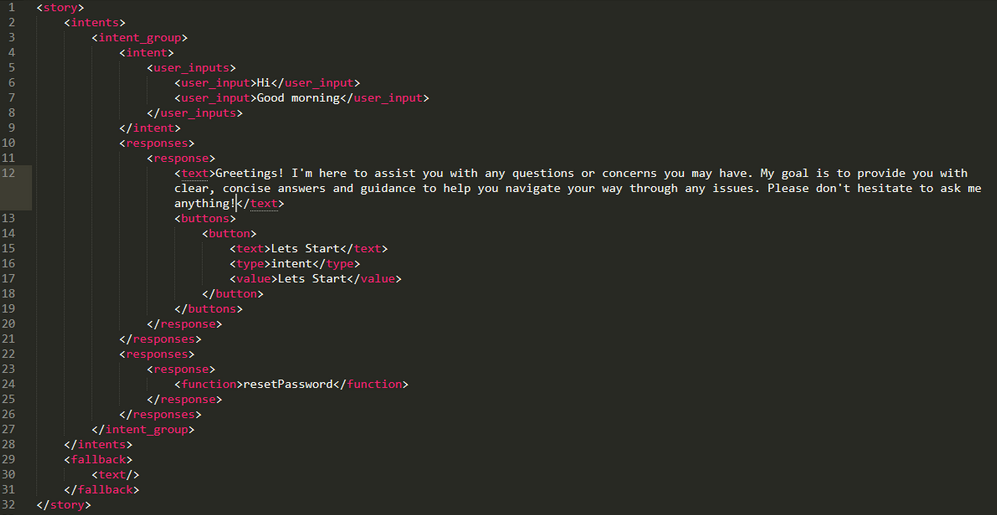
This XML file is structured to define a simple conversational “story” for a chatbot. It maps user input to corresponding bot responses. Open the XML file with any text editor.
Structure Breakdown
Story
<story> ... </story>
The main element here is <story>, which serves as the root node and encapsulates all other components of the dialogue flow. It’s a container for defining how the system should respond to various user inputs and what to do if it doesn’t understand the input.
Intents
<intents> ... </intents>
Inside the <story> element, we find the <intents> section. This section is crucial, as it contains the core conversational logic.
Intent Group
Each user’s “intent” is grouped under <intent_group>, which may be used to logically group similar intents for organization and handling. These are specific patterns or user inputs that the bot can recognize and respond to.
-
<intent_group>: Represents a group of intents.
-
<intent>: Represents a single user intention or phrase.
Under The Intent
Within the <intent_group>, there’s an <intent> element. This defines a specific type of user input that the system can recognize. The <user_inputs> sub-element lists different keywords a user might say. In this case, the input is simply “Hi,” which is a common greeting. This allows the system to recognize when a user initiates a conversation with a casual greeting.
-
<user_inputs>: Lists possible things the user might say.
-
<user_input>Hi</user_input>. This means if a user types “Hi”, the bot should recognize it.
-
Response
<response> ... </response>
Paired with each recognized intent is a <response> element. This section defines how the system should respond when a corresponding input is detected. Under this, the <response> element contains a <text> Sub-element that holds the actual response the system will send. In this example, when a user says “Hi,” the system replies with “Hi there! How can I assist you today?”
After recognizing an intent, the bot looks into this section for what to say back.
-
<response>: Defines what the bot replies with.
-
<text>Hi there! How can I assist you today?</text>: This is the exact message the bot sends.
-
Although this example shows just one input-response pair, the structure is flexible and can accommodate multiple user inputs and associated responses under each <intent>, allowing the system to feel more conversational and natural.
Fallback
<fallback> ... </fallback>
The file also includes a <fallback> element used as a safety net. This part defines what the system should do if it receives an input that doesn’t match any of the predefined intents. It acts like a polite, helpful assistant who gently guides the user back on track, rather than letting them hit a dead end or experience confusion.
Import Story
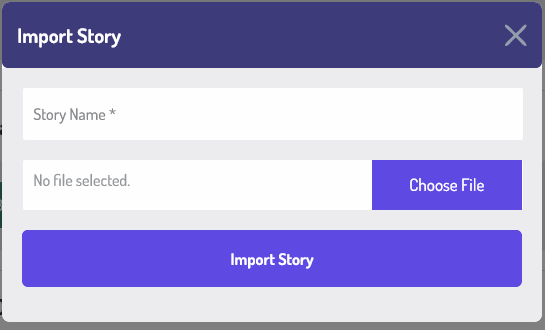
The Import button allows you to easily bring existing content from your device into your story. You’ll be prompted to choose a file from your computer when you click the Import button. After selecting the file, our system will automatically scan and process its content. Within moments, the text will be integrated into your current story workspace. The Import feature makes it seamless to integrate your content in just a few clicks. After choosing the file from your system, click on the import story button. Your story has been successfully built.